Customer Record Import
Overview: Point of Rental has a very simple way of doing a mass export of inventory to Microsoft Excel. It is for when you have more than 20 or so items that you want to change, it could be the naming scheme, description etc.… This prevents you from having to go into each individual item in File Maintenance and making those changes one at a time (i.e. more slowly).
From the Program Menu of Point-of-Rental, go to Configuration>Database Management>Customer Database Update. This will open a new window. Click on the button that says, “Raw data Exporter”

This will open the program Data Explorer. Click Display at the top right of the window and it will display every field in the item file table. Once displayed, click Excel Export.

Once you are in your spreadsheet program you can change the data to fit your needs.
a. You can use formulas to create the new/updated data, however, you must convert those columns to values.
b. Remove any unnecessary columns that won’t be used.
c. Save your finished file as a .CSV (Comma Separated Values) file type.
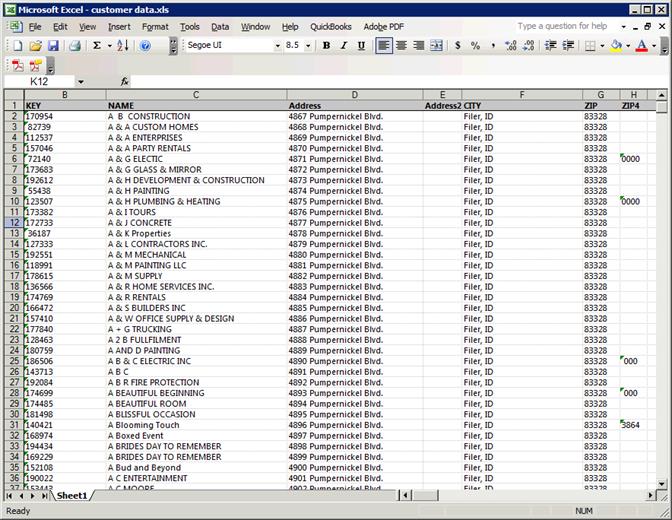
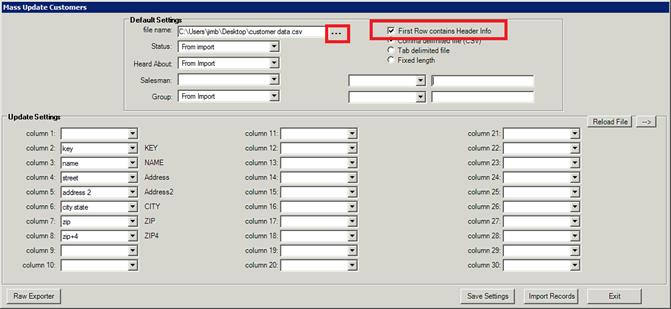
You are now ready to import the data. Go back to the Mass Update Inventory program, double click on the 3 dots that are circled in red and locate the file you saved. The other red circle needs to be checked if you left the title information in the Excel document. If you look at the excel document in this how to you can see that above all the item keys is the word “key” and so on. Checking the box tells POR to disregard the first line.

Once the file is loaded you can begin assigning columns to the drop-down menus. Below is the way it should look when it’s completed (if the first row of Excel has the item information like this example, it automatically puts the words next to each drop down box to make it easier).
Once you are done you can click import and you are finished
Tax Jurisdiction Import
Overview: Eliminate manual sales tax entries by batch importing a .csv file to create new or update existing Tax Jurisdictions and Zip Code mappings for destination based sales tax.
Program Menu-> Database Management-> Tax jurisdiction - Import
The following is an example of importing Tax Tables from Washington State - each state will be slightly different, but the concepts shown here can be applied to any import file.

1. In the Select Table Group drop down choose ‘Tax’.
2. Click the Find button to locate the file to be imported. .csv (Comma Separated Values) or .xls or.xlsx (Excel / Spreadsheet)
3. Click Load Sample to view the data in the top grid panel.

1. Move the column name from the import file to the appropriate line in the tax tree on the left
a. Drag the column heading A,B,C, etc… and drop on the appropriate field in the tree
In this example, this is how the mapping was done (See Row Key Definitions below)
1. Column B mapped to Row Key, Row key must be different for each line
2. Column B also mapped to Jurisdiction which will allow zip codes to be assigned to the correct Jurisdiction. Refer to the next section on Importing Tax Jurisdictions
3. Column A mapped to Description
4. Column G mapped to Active Date Active date
5. Maximum Tax is a set value of 999999.99, unless your state has a different value
6. Column F mapped to Tier 1 Rent/Sale/Damage Waiver/Item Percentage
7. Taxable Up to is a set value of 999999.99. Unless your state has a different value.
*Note: Setting a Value can be done by right clicking the field name in the tree. This is also where you can clear any mappings.
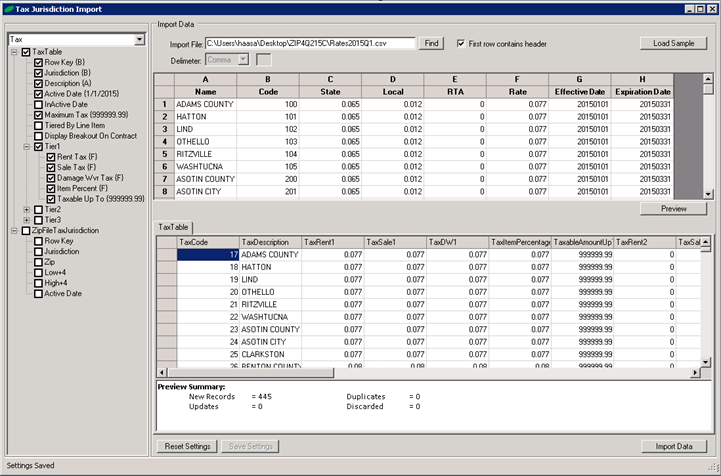
1. Once all the necessary columns are mapped click the preview button
2. If everything looks correct click the import data button