Employee Set Up
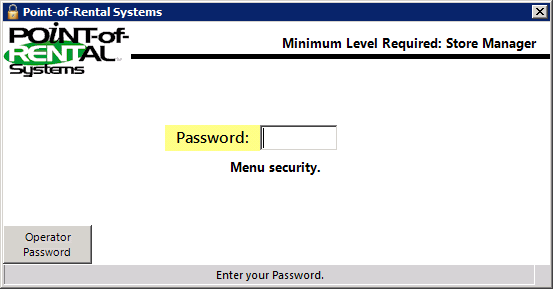
Overview: Anytime you are presented with the password screen there is a button in the bottom left corner labeled Operator Password. If you use this button you can identify yourself by entering your Operator ID, and then enter your Operator Password. This allows for the Store Level Passwords to be a thing of the past and proper identification of the operator giving the authorization.
Program Menu>Security>Employee Setup
GROUP – Allows you to select a group to add employees to (ex. Office, Warehouse, Drivers)
PAY TYPES – Allows you the method the employees is going to be paid (Hourly, Salary)
SHOW INACTIVES – Allows you to display inactive employees no longer with the company. You can not delete an employee, you can make them inactive
ADD – Allows you to add new employees to operator ID

Click add will allow you to add a new employee.
Information:

Number - This number is computer generated.
Inactive – Check the box if the employee is no longer employed.
Operator Id - This is a code the employee must enter to get access to the Point-of-Rental System. It can be any alph-numeric code up to 5 characters long.
Time Clock Id - if you are using the Time Clock magnetic cards for your employees to clock in, you porbably have two operatior id’s for each employee, one Operator Id for the counter id and one for the time clock id. You can now set a counter id an a time clock id for each employee. If you don’t use the magnetic emplyee cards then you would normally just set the counter id and the time clock id the same.
Time Clock Only – if the employee only needs to make time clock enteries but have no other access to Point-of-Rental Systems then click the box next to “ Time Clock Only”.
Name – this is the employee’s name. It is suggested to enter Last Name follwed by First Name.
Employee No – This is the employees’s number. This field is used for importing time clock entries into PayChex.
SS Number – This is the employee’s social security number. This field is optional.
Hire Date – This is the employee’s hire date. This field is optional.
Termination – This is the employee’s termination date. This field is optional.
Expense Rate - Employee pay rate.
Pay Type – Hourly, salary, etc
Language - Allows you to change langauge in your software based on your user ID and password.
Options:
Groups - You can select a specific group for this employee such as Mangers, Couter, etc. the groups are set by clicking the Group button.
Muti-group – This box being checked means that an operatior currently clocked in under a group will receive emails sent by the group..
Menu – If this employee needs special access, different fron the default terminal access, then select the appropriate menu security level in the Menu drop down box. The menu security levels are entered under Security, Menu Security.
Home Store – For mult-store systems select the home store of this employee. If the employee moves between the stores, select #000.
Cash Drawer – This allows the employee to use a specific cash drawer independent of wihich teminal the is working at. If this field is set to “None”, then the default cash drawer for the terminal the employee is working at will be used.
Deposit Drawer - This allows the employee to use a specific deposit drawer independent of which terminal he is working at. If this field is set to “None”, then the default deposit drawer for th eterminal the employee is working at will be used.
Contact:
Email - This si the emplyee’s email address,
Cell Phone - this is the employee’s cell phone number and cell provider.
Default Method – this is the method that the employee would like to be contacted when someon sends a message to them.
Office Phone – this is the office phone of the employee.
Security

Password – Set employee password. You have the ability to set a unique password for each employee.
Password Level - Set password level for password assigned to employee. Password levels ranges from lowest to highest ( Key Counter, Assistant Manager, Store Manager, Regional Manager, Owner).
SmartEquip Role: This is were you set the smartequip group for the employee. (See SmartEquip document for more details)
Max Discount % - This is the maximum discount that this employee is allowed to set on a contract. This amount overrides the maximum discount allowed in Parameters.
Max Price Change – This is the maximum line item price that this employee is allowed to change without entering a password. This amount overrides the Maximum Price Change for No Password defined in Parameters.
Max PO Amount - This is the maximum Purchase Order amoun that this employee can write. Any PO over that amount will need to get approval. An amount of 0 or blanc would mean the employee can write PO for any amount.
• Note:
Each operator ID should have their own password set and tied to the proper password level.
Store level passwords should be changed and not given to your employees; forcing them to use their new personal password.
When prompted for a password you can simply type in your personal password. This assumes that the system already recognizes you as the current user.
If you are entering in an Override password for another employee, simply click the Operator Password button in the bottom left corner. Enter your ID and then your personal password. By identifying yourself with your ID the system then expects your password. If your password is not entered the override would not be allowed.
Security Groups
Allows you to set security levels based on individual employees or employees within the same group. From system security, under security defaults, you can set the security levels (company or employee) to the different areas within your Point of Rental software. You can choose wihether those security setting are assigned to an indivdual or group. Once selected, you can go to Employee Id>Security Tab and on the left window pane you can check the box for the appropriate group.
Certifications
List all employee cerfications and training, along with the Certification Type, date, issure and expriation date.
Right Click on the Certification line, to add a new certification.
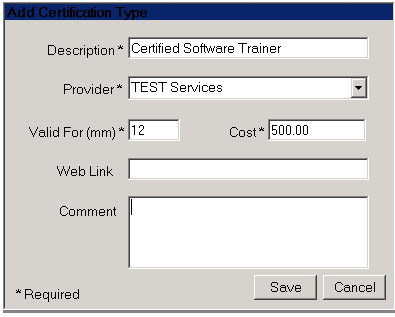
You can enter a description or type of cerfication, provider, how long the cerfication is vaild, cost, web link.
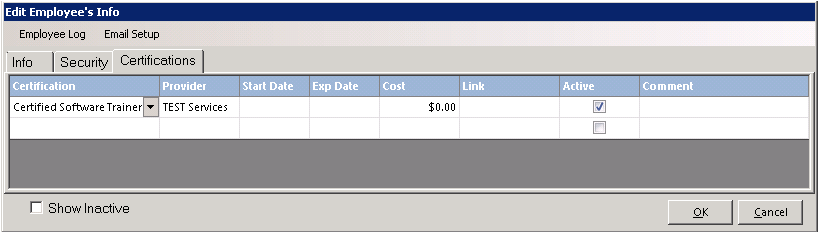
Once the information is entered it will appear in the list of cerfications. You can also check the box to make a cerfication active or inactive depending on the start and end date.
Application: The counter person is trying to overbook an item, but does not have a high enough password to do so. His supervisor comes over to approve. In the past, the supervisor would use the store password and the overbooking log would show the counter person as the person overbooking. Now, because the supervisor identified him/herself, the log will show them instead of the employee.