Auto Continuation
Overview: There are two types of Continuation Billing that must be done. Contracts that are already in the Continuation Billing Cycle and Contracts that have never been Continuation Billed. We separated these steps so you can review those contracts that have never been continuation billed and auto process those that are already in the Continuation Billing Cycle. As a rule, you should not continue a contract for a second month if the customer has not paid for the first month.
*Note: When running continuation billing you should always run both types (Non-Continued and already Continued).
* Note - If you have inventory items with headers on the contracts and try to continue, you will receive a warning message to serialize the unit and try again.
* Note 1 - Tax Jurisdiction: Auto Continued contracts will be updated to the replacement tax jurisdiction when the old tax jurisdiction has expired.
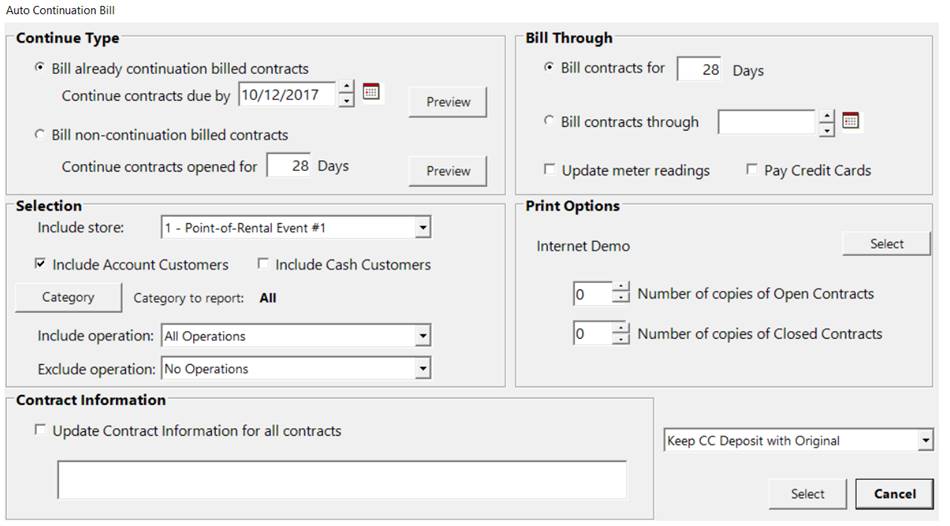
Continued Type:
Billed Already – Enter a date. The program will select all contracts due up to that date. You many enter any date in the past or future. You could select a date 28 days from today if you want to bill in advance, or select 7 days from today to bill 1 week early.
Bill Non – Select the number of days a contract must be open (it will default to 28). The program will then select, for continuation all contracts that have been open for 28 days. You could select 1 day if you want to bill in advance, or select 21 days to bill for 1 week early.
Note: The preview button will generate and interactive report displaying what will be continued.
Selection:
Include Store – Location the report is being generated for
Include Account Customers – Box checked will include account customers contracts to be continued
Include Cash Customers – Box checked will include cash customers contracts to be continued.
* Note - If there is any deposit in the deposit field, it will be carried over to the next continued contract. The original closed contract will show a negative deposit amount at the payment screen., the new contract will show a positive deposit. You will have to go all the way through the new contract for the deposit to show in the deposit field of the new contract.
Category – Allows you to choose only contracts with items in a specific category or all categories.
Include Operation – Allows you to choose contracts to continue based on the transaction operation. This could be used to bill contracts in advance. You could create an operation called “Advance Billing” or “Weekly Billing” Any contract marked with the operation of ‘Advanced Billing’ would be continued.
* Note: To change the operation go to Configurations>Transaction Configuration>Transaction Operations
Exclude Operation– Allows you to set the operation of a contract ‘Do not Continue’ when you do an auto continuation those contracts will not be continued. You will be asked if you want to exclude this contract from all future auto continuation. If you answer Yes, it will mark that contract with the operation and not ask you the next month on that contract.
* Note: To change the operation go to Configurations>Transaction Configuration>Transaction Operations
Contract Information:
Update Contract information on all contracts - With box check will update all contracts with message entered in the open space below. If used, it will overwrite any text currently in that field. It is not typical to use this feature.
Bill Through:
Bill Contracts – Allows you to bill the open contract for the number of days
Bill Contracts through – Allows you to bill contracts through the date specified. This Also allows you the flexibility to bill your cutomers through a future date or a past date. You can use the Bill Through feature to set a date, Pint of Rental wil then set that date as the close date on your contract when you are Auto-Continuation billing your contracts.
For Example: You can run your auto-continuation billings on August 2nd, you can set your bill through date as july 31st. Point of Rental will auto-continuation you contracts asn set the close date as the 31st of July. You ca then generate staements and use the setting “Only include contracts through 07/31/2017. Point of Rental will generate statements which include the continued contracts that had the Bill Through date on 07/31/2017.
Update meter reading – Checking this box will prompt the user to enter the hour meter of metered items. If you have updated hour meter readings throughout the month either manually or from an AEMP set up the field will populate with the last reading. You can change if needed, then accept.
Pay Credit Cards – Checking this box will prompt the user to process the credit card for the closing contract, for Cash customer only, and the original contract must have been paid by a credit card.
CC Deposit – Allows you to either keep CC Deposit with the Original Contract or not to send. Note: Youe will nee to set up a disbursemet ite with tne name that starts with CC Deposit. If you do not want to use this feature, you would need to mark the disbursment as inactive.
Print Options:
Select – Allows you to select which printer to print the contracts to.
Printer – Select a default printer where the report is to print out.
Number of Copies Open Contracts – Allows you to select the number of copies of open contracts to print
Number of Copies Closed Contracts – Allows you to select the number of copies of closed contracts to print
After setting the criteria in the auto continuation, click on the select button, you will be given the option to view the contracts to be continued.

You can check the box in the select column to select or unselect the contracts to be continued. Clicking on the customer’s name, will open the customer dashboard for the customer where you can view customers detail information.
Click the continue button.
.

Each contract will be displayed one at a time and a prompt to select, reject, proceed or abort. If you choose to select, it will continue that one contract and then bring up the next one with the same select, reject, proceed and abort choices.
Reject - It will not continue the contract and go on to the next one
Proceed - It will go through and continue all the subsequent contracts
Abort - It will not continue any contracts and bring you back to the initial screen.
Symbols – To select press ‘S’ to reject press ‘R’ to proceed press ‘P’ to abort press ‘A’.
* Note: The cash or check deposit it will continue to move to the continued contracts, until the contract will no longer be continued. On the final contract, you can either apply the deposit to the rental/sale or refund the deposit back to the customer.
* Credit Card Deposits will either be moved to the balance due on Rental/Sale (to zero out the deposit) of if the contract is paid, the Credit Card Deposit will remain on the original contract and will have to be manually moved to the continued contract.
The most efficient way to handle this process is to go to your Active Deposits Report. From the Program Menu>Accounting Reports>Accounting Reports Menu> Active deposit Details. From there you can click on the customer in the report and see their contracts. Right click on the original contract and go to modify, go to the payment screen and make a negative payment in the deposit field for the deposit amount being held, use the payment type of cash. Then go to the continued contract, right click on it to modify. Go to the payment screen, make a deposit payment for the same value by cash to the continued contract.
* Note - If you have inventory items with headers on the contracts and try to continue, you will receive a warning message to serialize the unit and try again.
* Note 1 - Tax Jurisdiction: Auto Continued contracts will be updated to the replacement tax jurisdiction when the old tax jurisdiction has expired.
Continued Type:
Billed Already – Enter a date. The program will select all contracts due up to that date. You many enter any date in the past or future. You could select a date 28 days from today if you want to bill in advance, or select 7 days from today to bill 1 week early.
Bill Non – Select the number of days a contract must be open (it will default to 28). The program will then select, for continuation all contracts that have been open for 28 days. You could select 1 day if you want to bill in advance, or select 21 days to bill for 1 week early.
Note: The preview button will generate and interactive report displaying what will be continued.
Selection:
Include Store – Location the report is being generated for
Include Account Customers – Box checked will include account customers contracts to be continued
Include Cash Customers – Box checked will include cash customers contracts to be continued.
* Note - If there is any deposit in the deposit field, it will be carried over to the next continued contract. The original closed contract will show a negative deposit amount at the payment screen., the new contract will show a positive deposit. You will have to go all the way through the new contract for the deposit to show in the deposit field of the new contract.
Category – Allows you to choose only contracts with items in a specific category or all categories.
Include Operation – Allows you to choose contracts to continue based on the transaction operation. This could be used to bill contracts in advance. You could create an operation called “Advance Billing” or “Weekly Billing” Any contract marked with the operation of ‘Advanced Billing’ would be continued.
* Note: To change the operation go to Configurations>Transaction Configuration>Transaction Operations
Exclude Operation– Allows you to set the operation of a contract ‘Do not Continue’ when you do an auto continuation those contracts will not be continued. You will be asked if you want to exclude this contract from all future auto continuation. If you answer Yes, it will mark that contract with the operation and not ask you the next month on that contract.
* Note: To change the operation go to Configurations>Transaction Configuration>Transaction Operations
Contract Information:
Update Contract information on all contracts - With box check will update all contracts with message entered in the open space below. If used, it will overwrite any text currently in that field. It is not typical to use this feature.
Bill Through:
Bill Contracts – Allows you to bill the open contract for the number of days
Bill Contracts through – Bill Contracts Through - Allows the billing of contracts through a specific date. This allows for weekly, biweekly, or partial month billing. The open contract will be created for a month for inventory control, but when billed again will close based on this setting. When using this feature, the Closed Date will be set to the Bill Through Date.
(i.e. Auto-continuation billing is run on August 2nd, and bill through date is set to July 31st. Point of Rental will auto-continuation bill your contracts and both the end and close dates will be set to July 31st. Additionally, when statements are created, the setting “Only include contracts through” can be set to 07/31/2017”. Point of Rental will generate statements which include the continued contracts that had the Bill Through date of 07/31/2017.
Update meter reading – Checking this box will prompt the user to enter the hour meter of metered items. If you have updated hour meter readings throughout the month either manually or from an AEMP set up the field will populate with the last reading. You can change if needed, then accept.
Pay Credit Cards – Checking this box will prompt the user to process the credit card for the closing contract, for Cash customer only, and the original contract must have been paid by a credit card.
Print Options:
Select – Allows you to select which printer to print the contracts to.
Printer – Select a default printer where the report is to print out.
Number of Copies Open Contracts – Allows you to select the number of copies of open contracts to print
Number of Copies Closed Contracts – Allows you to select the number of copies of closed contracts to print
After setting the criteria in the auto continuation, click on the select button, you will be given the option to view the contracts to be continued.
You can check the box in the select column to select or unselect the contracts to be continued. Clicking on the customer’s name, will open the customer dashboard for the customer where you can view customers detail information.
Click the continue button.
.
Each contract will be displayed one at a time and a prompt to select, reject, proceed or abort. If you choose to select, it will continue that one contract and then bring up the next one with the same select, reject, proceed and abort choices.
Reject - It will not continue the contract and go on to the next one
Proceed - It will go through and continue all the subsequent contracts
Abort - It will not continue any contracts and bring you back to the initial screen.
Symbols – To select press ‘S’ to reject press ‘R’ to proceed press ‘P’ to abort press ‘A’.
* Note: The cash or check deposit it will continue to move to the continued contracts, until the contract will no longer be continued. On the final contract, you can either apply the deposit to the rental/sale or refund the deposit back to the customer.
* Credit Card Deposits will either be moved to the balance due on Rental/Sale (to zero out the deposit) of if the contract is paid, the Credit Card Deposit will remain on the original contract and will have to be manually moved to the continued contract.
The most efficient way to handle this process is to go to your Active Deposits Report. From the Program Menu>Accounting Reports>Accounting Reports Menu> Active deposit Details. From there you can click on the customer in the report and see their contracts. Right click on the original contract and go to modify, go to the payment screen and make a negative payment in the deposit field for the deposit amount being held, use the payment type of cash. Then go to the continued contract, right click on it to modify. Go to the payment screen, make a deposit payment for the same value by cash to the continued contract.