
Overview: The Work Order function in the Point-of-Rental system is used to track repairs, service, or maintenance that you are providing your customers for their equipment. A work order generates income as you are selling your customer your labor and your sales or parts inventory. Essentially, it is a sales contract with a due date that you can track its status.
As usual, there are database issues that require some attention. By default, there is an item in your database with a key of “WO-MISC”. It is a special type of item that goes on the work order to keep it open. You can create other work order items to track the different types of equipment you service (“WO-CHAINSAW”, “WO-LIFT”, “WO-B52” etc. [The key must start with ”WO-“]). You may want to enter a sell price on these items as a bench fee to cover the cost of diagnosing these repairs. The print out tab of these items might contain the terms of your repair policy. These items will usually have their own category (Work Orders). You can also create “WO-“items for specific customer’s equipment that let you track the maintenance or repairs done to that equipment just as you are able to do with your own equipment. These items can be created as you create the work order. This allows for maintenance schedules to be setup so you can keep track of necessary maintenance for your customer as a value added service. This service is beneficial to your customer; having accurate maintenance records could increase the value of your customers’ equipment when they decide to sell.
The work order selection screen will display the Work Order Key, Description of the Item, Record Number, Store Locations, Price, Serial Number and Part Number.
Add Work Order Item - Allows you to add an item to the Selected Work Order Item Menu
Customer History - Allows you to see all of the items this customer has previously purchased from you.
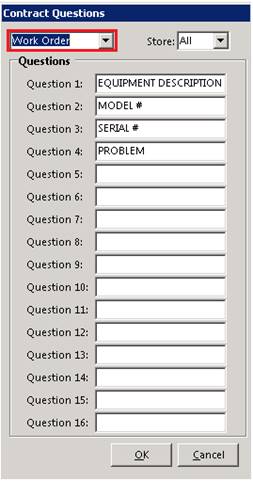
You may want to use the “Contract Questions” function under #9 Configuration>Transaction Configurations>Contract Questions to create Work Order prompts for required information (Equipment Description, Model #, Serial #, Problem, etc). Remember an * at the beginning of the prompt will force a response when creating the work order. These questions and the responses will print on the contract.
To create a work order from the counter menu select New Contract>Work Order. You will then select or add the customer from or to the database. It will then require you to “Enter a Committed date” and you will select from the calendar or enter the date that this work order will be due. You will then enter the time due.
If you have created Work Order questions they will now display and the information may be entered.

A list of the work order items that are in your database will appear and you will select the appropriate one or you can click on the “Add WO Item” button to create a serialized unit record specific to this customer. This will bring up a window where you can enter the name of the item, serial #, manufacturer, model#, purchase date, warranty end date and category. The key of the item should not be changed as it contains the customer’s number and ties this item to the customer record. Next time you write a work order for this customer the work items tied to that customer will appear in the list.
After the work order item is on the contract the “Add Comments” screen will display where you can enter additional information concerning the nature of the repairs or service. The contract questions and answers will be there for all to see. Cancel or Escape to continue.
At the contract processing screen the “Select Operation” prompt will be highlighted where you may enter in one of the statuses(“In Repair”, “Repair Complete”, “Waiting on Diagnosis” or “Waiting on Parts”) that are defaults to the system. Additional operations can be added as needed through Transaction Operations in Transaction Configurations under # 9 Configurations.

A prompt to “Enter summary for Work Order” will appear and you should note what you are repairing as a reference.
The system will now go to the payment screen where you can take any applicable payments as desired and the payment method as with any contract. Of course, if the customer has a charge account no payments will be required. The print screen options will then be displayed where you can choose to print or not. You now have an Open Work Order.
If you look in “Day at a Glance” under the “Work Order” tab you will see the open work orders so you can track and control them.
You will modify and sell to the work order your parts or sales items and your labor to give the contract value. You can add special order items or parts from a parts database to the item database from the work order, and, if you have the Purchase Order Module, create the purchase orders from the work order and track those parts order status from the work order. You can also update the operation status as the work order progresses which you can see from “Day at a Glance”. “Call logs” should be created to record any communications with your customer regarding the work order. All this information will be available to anyone who looks at any Work Order in the system.
Once the service or repair has been completed, the value of the work order set, and the customer is ready to receive back the equipment you must close the Work Order as you would a rental contract. From “Day at a Glance” or “Close Contract” you will close the contract which will close the work order item. If that item had value (Bench fee, Diagnosis fee) and you are applying that value to the cost of the repair you will need to zero out the cost of the work order item so the monies paid can apply to the work order’s total. If you did no repairs as the cost to the customer was not worth the effort then you leave the work order item at its original cost and keep the bench fee to cover the costs of diagnosing the problem. You must close the Work Order in order for an invoice to be generated if you are billing your customer. If you are not billing your customer close the Work Order and take payment just as you would on a rental contract.
From the Program Menu #14 Maintenance Reports you have “Work Orders Pending”, “Work Order Detail”, and “Work Order Item Maintenance” to look at active work orders, work order information from any or all work orders, and, if you set up maintenance schedules on your customers “WO-“ items, see those items with maintenance due so you can contact the customer and hopefully generate some more business.
Adding Items that Need to be Ordered onto a Work Order
Since a mechanic may need to add an item to a work order that is not in inventory they have the special order button to click on. Since they may not know the price they can add the item at 0 price. After the pending purchase order that item is on is submitted, the purchaser would put in the purchase and likely the sell price. When the work order is closed, Point-of-Rental looks to any item with a price of 0. If the item record has a sell price, it will populate with that. If the sell price is empty it will defer to the purchase price so at the very least your company doesn’t lose money.

Waiting on Parts: The system will automatically change the contract operation to "Waiting on Parts" whenever right clicking and selecting Order Items. Also, whenever someone receives the parts for this contract through Purchase Orders, he will automatically be sent a notification of the received parts. Whenever all of the items for the contract have been received and are in stock, the contract's Operation will automatically be flipped to "In Repairs" and the mechanic, customer or any other employee waiting for that knowledge can be set to notify on change of Operations and they would automatically be kept up to date as well.
Work Order Notes:
A print out of all your work orders is available by selecting “Work Order Report” which can be accessed from “Maintenance Reports” on the Program Menu.
A listing of all your work orders that are due or overdue will automatically print during end-of-day processing.
You may add sale or part items to the ticket at anytime by using Modify Contract.
Special Order items can be added at anytime by clicking on “Special Order” on the Item MORE screen or by selecting “Add Part Item” pull down menu from the contract detail menu. Any non-stocked item needed for the work order should be added as a Special Order item.
Items are not pulled from inventory until you right click on the item and select “Pull inventory” or the Work Order is closed.
When the work has been finished and the customer is picking up his repaired item(s), you must use Close Contract to complete the Work Order.
Waiting on Parts: The system will automatically change the contract operation to "Waiting on Parts" whenever right clicking and selecting Order Items. Also, whenever someone receives the parts for this contract through Purchase Orders, he will automatically be sent a notification of the received parts. Whenever all of the items for the contract have been received and are in stock, the contract's Operation will automatically be flipped to "In Repairs" and the mechanic, customer or any other employee waiting for that knowledge can be set to notify on change of Operations and they would automatically be kept up to date as well.
Work Order Formats
This gives you the opportunity to customize each contract format without actually having to create a customized contract. Note: The Parameters option will only be available if you are using a parameter based contract format such as Contract-Params.rpt. Custom contract formats generally are not parameter based
•Configuration>System Configurations>Laser Contract Formats>Select Edit Contract Attachment’s in the bottom left corner.
Edit Contract Attachments –This option allows you to define your own wording to print out on the contracts that match the criteria of the options below. By selecting this option you will get the following menu:
Backside Legal – This option is for the full page legalese that prints on the backside of the contract. This needs to be formatted as a Rich Text Format (RTF) file. Note: this will actually print before the contract.
Owner Signature – California Owner’s Signature – This option allows you to print contracts with the owner’s signature as well as the customer’s. The signature is copied and pasted from a .jpg file and will print on all contracts.
Credit Card Author – This form is used for the customer to fill out for credit card authorization. This form needs to be a Rich Text Format (RTF) file. This form can be turned on or off to print under the laser contract format setup.
Marketing Page – This form is used to send a marketing page with a contract. This form needs to be a Rich Text Format (RTF) file. This form can be turned on or off to print under the laser contract formats
Footers
See footers in Laser Contract Formats