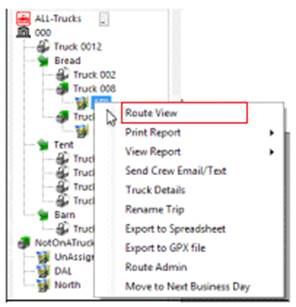
The Stop order for the route still needs to be determined. When looking under the route column you will see an assigned number with a . zero. The number is the route number the .zero is the stop number. The zero indicates that a stop number has not been set. Once the Trip has been routed each contract will display as the route number. X where X indicates the new stop number.
1, Right Click on the route under the truck a box will display the following:
2. Select Route View – This will start the routing process

3. Route Start/End – Usually your store location will be the start of the route, with the trips assigned in the middle and ending route will most likely be your store location..
4. Driver/Crew – Assign the driver and crew and their start time.
5. Route Departure Time – Allows you to either select Dynamically or Manual Departure Time
a. Dynamically – Will compute the departure time automatically
b. Manually – Selecting this option allows you to manually select the Departure time. Select the time to the right.
6. Map and Grid - You can either choose to Map and Grid or Grid only.
* Map and Grid - will show routes on map, by choosing this it will add functionality like validating stop address, verifying on-time statues and the ability to visually check the routing.
After specifying the departure time, click the Map and Grid button. The dispatch center will validate each address.
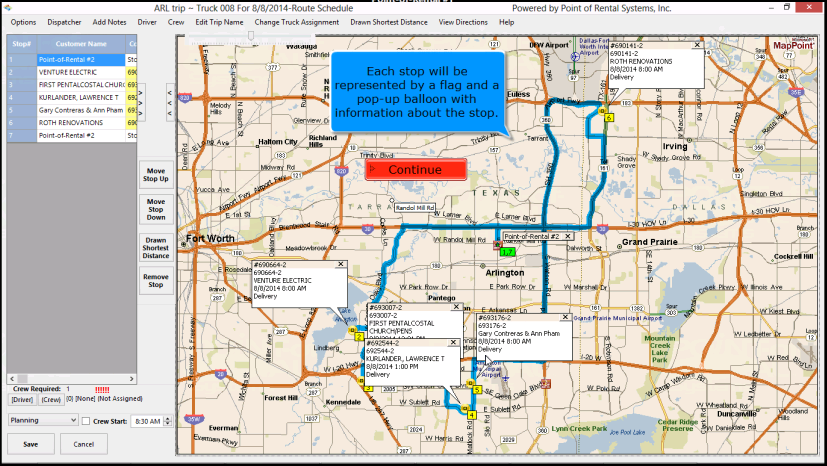
Map Features
Each stop will be represented by a flag and a pop up balloon with information about the stop.
a. Right clicking the balloon, gives you additional options.
b. Select Hide All Options. The pop ups disappear.
Moving around maps
a. Click and Drag map to move
b. Sliders – The slider is located at the top of the screen, you will be allowed to zoom in or out on the map
Draw Shortest Distance – This will allow you to optimize your routes.
a. Sequential – will route based on the stop number in the left panel.
b. Chronological – will route based on the stop times.
c. Distance – will route based on fastest drive time.
* Note – You will also have the option to run these in reverse.
7. Once you select your option, click yes, to draw the route.
8.. Click the >>> button to hide the map and bring up the trip for the truck.
*Grid Only – will set the routes without maps.

Moving Trips
To manually move a stop up or down, select a contract by clicking on that line. There are fields that you cannot click on to move a stop. ( Arrival, On-Site Time, Crew, Contract Unload Time) as clicking these fields allow you to quickly update them.
You can also move trips up and down by selecting the buttons on the far right. ( Move Stop Up, Move Stop Down, Draw Shortest Distance, Remove Stop).
* Note – if you manually change the order of the stops you should select the draw route option again. The Map Options box will come up again and give you the option to optimize the routes.
Once all the routes have been adjusted manually, the On-Time Status indicates that all stops will be on-time or early.
Crew Counts
9. Click the Crew required field to change the crew count (if necessary). The Stop schedule box will reopen and you can change the number in the crew count box.
* Note - When changing the crew count on a contract you will be prompted to update all contracts to the new crew count or just the one contract. This allows for additional help to be on-site for a large job in order for the routing to be accurate. When done select update.

If you see red exclamation points, this indicates that the driver and crew count do not match the required number.
Click on the driver link at bottom right of the screen.

a. Select a driver from the select driver box.
b. Select the crew from the select crew list.
Once the Driver and Crew match the Crew required for the route the red exclamation points will not display.
Once satisfied with the route save it with the appropriate status. Select Ready to load to continue. Click Save.
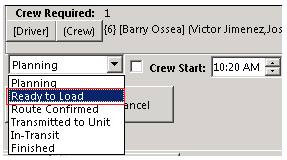
Planning – Allows you to set the trips to the truck and assign drivers, helpers, man minutes, geo location.
Ready to Load – Once the route number has been updated to include stop numbers, the Route Status is changed to Ready to Load.
Route Confirmed – If you are TSO intergraded, route information will be sent to TSO, then to your GPS units.
Transmitted to Unit - Need to be TSO intergraded. Information is updated to GPS units.