
By default, the display will default to the open tab, you will be able to view all (Open, Pending, Credit, Closed, Posted, AP Export, Sub Rental) purchase orders at a glance by selecting the appropriate tab.
Purchase Order Column
Above the first row on the purchase orders, you will see a blue header bar. Right clicking on this bar and checking the box, will allow you to select the columns you would like to view on the main page of the purchase orders.
* Note: It is recommended you check back regularly to see new added columns.

Tools:
New Purchase Order - Allows you to create a new purchase order
New Credit Purchase Order – Allows you to create a credit purchase order.
Exit to Dashboard- Takes you back to the Classic Purchase Order Menu, Selecting Dashboard from the classic Menu will allow you to toggle between both Classic and New purchase order screens.

(Classic View)
Reports:
Vendor Reports - Allows you to print out a report of all Vendors
Purchase Order Report - Allow you to print a report detailing all of the purchase orders during a selected time period.
PO Trend Report - This report shows the dollar value of purchases broken out for rental inventory, resale and parts for three user define periods. This report can be grouped by Company, Store Division, Category, Vendor, Item or Month.
Options:
Export to AP - Allows you to export purchase orders to an iif file to be imported into your accounting software. An import file will be created with the name of AP yyyy.mm.dd.batch#.iif for QuickBooks and yyyy.mm.dd batch#.Ap.csv for comma delimited. The file will be stored in the export directory defined under Program Menu> Configurations>Account Numbers.
Vendor File - Allows you to store all information pertaining to vendors.
GL Accounts - This is a user selected field to designate the general ledger account to expense the purchase. The G/L Account numbers can be setup under the Purchase Order Main Menu.
Set PO Formats - Allows you to define up to ten different laser contract formats. Several of these have been predefined for you. You can modify the existing formats to create new formats using Crystal Reports. The Description will display on the screen when printing out a purchase order.
Show Items - This will show all items listed on the purchase order
Partial Only - This will only show items still waiting to be received. (Ex. Back Ordered Items)
Filter By:
Operators - This will allow you to show all (Open, Pending, Credit, Closed, Posted, AP Export, Sub Rental)
Vendors - This will allow you to select from a list of vendors from the drop down menu on right side. Select your vendor, purchase order for this vendor will be displayed
Payment Method - This allows you to select from different types of payment methods (Account, Billing, COD, Credit Card, Check, Net 30, 60,90).
Exit - Will take you back to the Classic View of Purchase Orders.
Grouping - Allows you to select different groups (Employee, Income,Payment Method,Ship Method Status,Store, Vendor Name) and view total quantity and amount of the purchase order based on the type of group selected.

Writing a Purchase Order
From tools in the upper right corner of the screen, select New PC. You will need to select a vendor for the purchase order.

You can lookup a vendor by the first part of their name, contact person’s name, products offered, or the computer assigned vendor number. If you use one of the lookups other than vendor number, you will get a MORE screen listing all vendors matching the lookup entered. The MORE screen will look similar to the following screen:
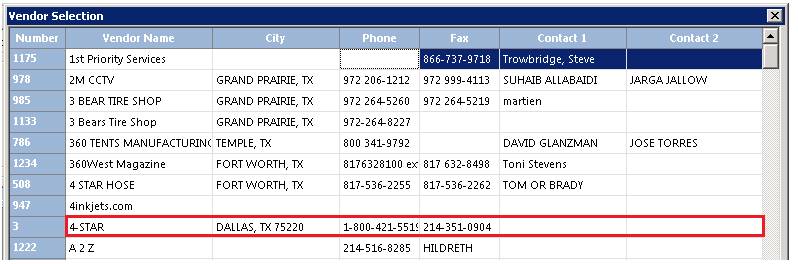
Simply click on the desired vendor to select. If the vendor does not exist, then click on the Add button to create a new vendor. You may add the new vendor, very similar to adding a new customer.
Once you have selected the vendor, a screen will be
displayed showing all of the items previously purchased from this vendor that
need to be reordered. You can select those items or click cancel.

* Note: Items must be set up correctly in File Maintenance. Bulk items must be checked in the options tab of the item record, and serialized unchecked. For optimum use, reorder minimum and maximum must also be set.
Use Dynamic Reorder Value – this option allows the reorder point to be dynamically computed from the number sold for the time period selected. If you select this option, you must select the beginning and ending dates to calculate the quantity sold. The computer will then go through all of the sales for the items for that time period to calculate the total quantity sold. This number will then be checked against the quantity on hand. If you don’t have sufficient quantity on hand to fulfill the same demand as last year, the quantity necessary will be listed in the Reorder column with a red background.
Show Items within 0% of reorder – with this box checked, only those items whose reorder quantity is within the percentage entered will be displayed. For example, if the percentage entered is zero, then only those items that need to be reordered will be displayed.
Show Items with 0 min reorder – with this box checked, all items will be displayed for this vendor. With this box unchecked, only items that have something other than 0 in their minimum reorder value will be displayed.
Show Rental Items – with this box checked, both resale and rental items will be displayed. With this box unchecked, only resale items will be displayed. This option is not available if Use Dynamic Reorder is selected.
Show All Stores – with this box checked, items from all stores will be displayed. With this box unchecked, only the items from your store will be displayed. This option is only available for multi-store systems.
Create PO with Reorder Quantities – this button will put all of the items listed as needing to be reordered on to the purchase order. The quantity entered on the purchase order will be the reorder quantity modified for any case quantities or maximum reorder value. After the items have been put on the purchase order, you will be able to modify the order quantity or add other items.
Done – this button will take you to the Purchase Order screen
Purchase Order
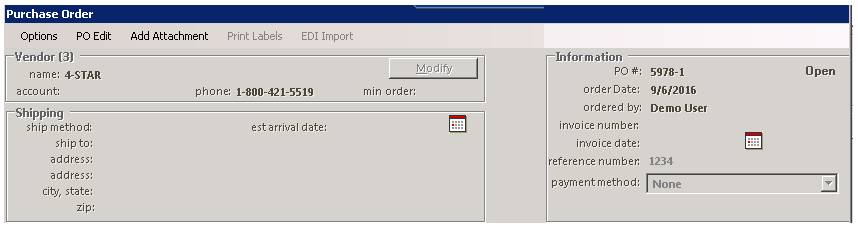
Vendor
Name – this is the Name of the Vendor you are ordering the items from.
Account – this is the account number associated to the vendor..
Phone – this is the phone number associated to the vendor.
Modify – this is used to modify the vendor record.
Shipping
Ship Method – this is the method on how the items ordered are to be shipped. (UPS, Ground, etc)
Ship To: – this is the Name of the place the items are to be shipped to from the vendor.
Address – this is the address the items are to be shipped from the vendor.
City, State – this is the city and state the items are to be shipped to from the vendor.
Zip – this is the zip code the vendor usesto ship the items to you.
Estimated Arrival Time – this is an optional date field that holds the anticipated arrival date of the requested item.
Information
PO # – this is the number the system assigns to the purchase order. (Used for referencing, opening, closing, inquire, modify)
Order Date – this is the date the purchase order was created.
Ordered By – this is the operator who created the purchase order.
Invoice Number – this is the invoice from the vendor. This is not normally filled in unto the POR is received and the packing slip have the invoice number.
Invoice Date – this is the date the invoice was entered.
Reference Number – this is the number you will use to reference your purchase orders. Type in the vendor's quote number in the Reference Number search and the purchase order will be displayed.
Payment Method – allows you to select the payment method from the drop down menu. New payment methods can be entered through PO Payment Methods on the Configuration Menu of the Program Menu.
Pending – With this box checked, the purchase items will be in a pending status. Normally, items in a pending status are waiting for approval from a supervisor due to dollar amount or highter authorization needed.
Items:
Key – this is the key of the item.
Number – this is the computer assigned item number for that item. If this is a non-inventory item, the item number will be 0.
Name – this is the name of the item. If you double click on the name field, the inventory record will be displayed. If this is a non-inventory item, you will be given the opportunity to change the name.
Part Number – this is the part number of the item. If you double click on the part number field, you will be able to change the part number. Note: This does not change the part number in the item record. It will only change the part number on this purchase order.
Qty – this is the quantity ordered. If you double click on the quantity field, you will be able to change the quantity ordered.
Received – this is the quantity received. If you double click on the received field, you will be able to change the received quantity.
Cases –this is the number of cases ordered. This number is normally the same number as the quantity ordered; however, for items that are ordered in a case, the cases would be the quantity ordered divided by the case quantity. If you double click on the case quantity field, you will be able to change the number of cases ordered. Note: Each item record has a field for case quantity. If that field is filled in, then the cases number will automatically be entered, rounding up to the nearest desired quantity in full case increments. Please note the field rental case is for entering in the quantity for the case you rent out: for instance, you buy water goblets in cases of 36(case quantity field), but the racks you send them out on rental in hold 25 each (rental case field).
Date Recvd – this is the date the items were received. This date is automatically defaulted to the current date whenever the item is received.
Price Each – this is the price for each individual item. If you double click on the price each field, you will be able to change the price.
Ext Price – this is the extended price which is the quantity ordered time the price each. This amount is automatically computed. If you double click on the ext price field, you will be able to change the extended price. Once you do this, the individual price each will be recomputed by dividing the extended price by the quantity ordered.
Expense To – this is a user entered free format field, for multiple store systems, this would normally be the store number. For single store systems, you can type something or leave it blank. If you double click on the expense to field, G/L account number field, or the comments field, you will get the following screen:
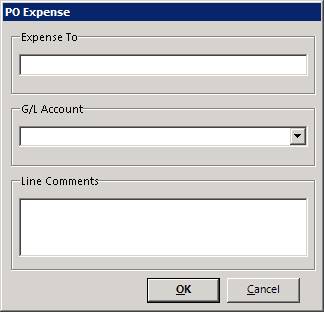
G/L Account – this is a user selected field to designate the general ledger account to expense the purchase. The G/L Account numbers can be setup under the Purchase Order Main Menu.
Line Comments – this is a free format user entered field that can include any information that you want to store about this particular line item. To access it, double click in the field.
By right clicking on any of the line items, a menu will be displayed with the following menu options:
View Item Record: This option displays the item record. It is not available for non-inventory items.
Change Sell Price: This option allows you to change the sell price for this item. Note: Depending on the password level required to modify the sell price, you might be required to enter a password. You can change the password level under Security; Data File Security.
Line Comments: This option allows for one line of comments to be entered for the line item.
Print Label: This option will print a barcode label for the item. This is useful during receiving to print labels for all the items received.
Add Item: This option allows for the non-inventory item to be added to the inventory. This option is only available for non-inventory items that have not yet been received.
Modify – this button is used to modify the vendor record.
Export to Spreadsheet – Exports your items to a spreadsheet.
‘~’ Placed in the first position of any line in a Purchase Order Note will prevent that line from printing on a PO. You can separate lines by pressing the enter key.
Items for Vendor – this button is used to show all the items that has this vendor marked in its item record. This is the same screen that is displayed when the purchase order is first opened.
Inventory Item – this button is used to select an Inventory Item. The selection is the same method as elsewhere in the program. This selection is useful if you haven’t set the associated vendor in each item record.
Non-inventory – this button is used to add items to the purchase order that are not a stocked item (i.e. toilet paper and soap). When you select this option, you will be asked to enter the item name, part number, quantity to order, and purchase price. If you do not want to add another item, just leave the item name blank and press ENTER.
Print – this button will print the purchase order. This option will not be enabled until a purchase order has been created and given a purchase order number. You have 3 print format options: Brief, Semi-Detailed, and Detailed.
OK – this button will accept the changes made to the purchase order and return you to the main purchase order menu.
Apply – this button will save the changes to the hard drive that you have made to the purchase order. You can use this button to assign a purchase order number before you are actually finished writing the purchase order. This is helpful when you are calling in an order to a vendor and you want to give them a purchase order number without writing the entire purchase order while the vendor waits.
Subtotal – this is the total of the extended prices for all the line items on this purchase order.
Tax – this is the total amount of tax charged on this purchase order.
Shipping – this is the total amount of shipping charges on this purchase order.
Miscellaneous – this is any other amounts associated with this purchase order.
Total – this is the grand total price of the purchase order including tax, shipping, and miscellaneous charges.
* Note: The sales tax, shipping charges, and miscellaneous charges will be distributed to the extra charges for each line item on the purchase order. The amount of extra charges attributed to each line item will be the price each divided by the purchase order subtotal. That number is then multiplied by the tax amount plus shipping charges plus miscellaneous charges