
Overview: Creating preventative maintenance schedules for rental equipment and updating the records as maintenance is completed.
1. From an Item Record within File Maintenance. Select Maintenance, then Item Maintenance Schedules as shown below.
Note: When Item maintenance is configured in the header record, it will prompt you to update the serialize items. Selecting ok will update all serialize items records associated under the header record.
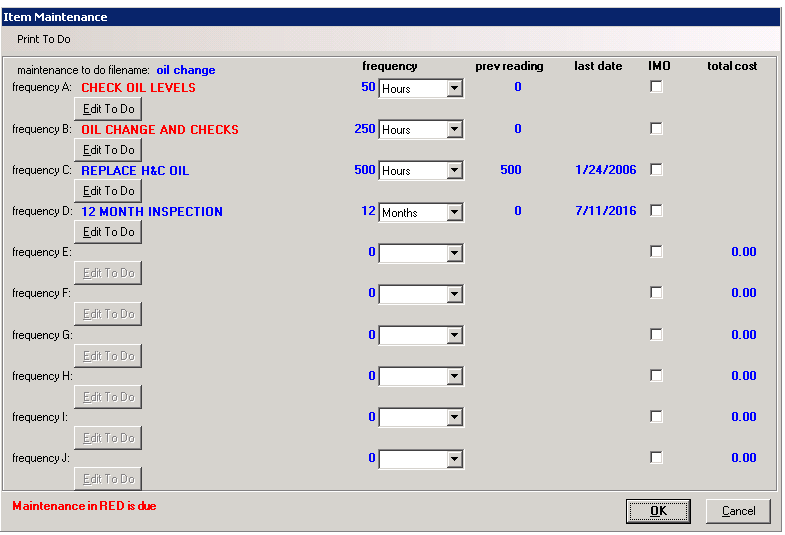
2. In the Item Maintenance screen you will see 10 potential maintenance schedules. Fields are as follows:
a. Maintenance to do filename – This is only used if you want to create To Do lists that will print when a maintenance is due.
b. Frequency A – Frequency J – Description of the maintenance schedule.
c. Frequency choices are Hours, Times, Days, Months, Units, or Days on Rent. You may give it a number for that frequency. For example, an Hour Metered piece of equipment, like a Bobcat, you would schedule routine maintenance such as an Oil Change based on hours run. Items that do not have an hour meter such as a tiller, you may want to schedule based on times rented. Scheduling annual services would be done every 12 months.
1. Hours - Hour meter or hours on rent (24 hours = 1 day)
2. Times - Number of times rented (regardless of rental length)
3. Days - Actual number of calendar days (regardless of rentals)
4. Month - Actual number of calendar months (regardless of rentals)
5. Units - Number of units (miles, measuring wear, alternate to hour meter etc...)
6. Days on Rent - Number of days on-rent (example: 14 days; if a rental does not exceed 14 days the maintenance schedule will not be triggered)
d. Previous Reading will calculate based on your frequency type, and will reset when this maintenance is cleared. If this frequency is being set up for the first time, set the reading for the previous time this maintenance was performed.
e. Last Date, when the maintenance is cleared this will reset. If this frequency is being set up for the first time, set the reading for the last time this maintenance was performed.
f. Checking the IMO box will allow the system to create the IMO automatically when the Frequency is due. This helps automate the IMO creation process for your mechanics. (An IMO allows you to keep track of Maintenance through the Day At a Glance screen and apply repair and labor cost to the item.
g. Total Cost keeps track of your total expenses by Frequency. This number is NOT part of your repair cost on the Asset tab.
3. In the example below, You will see there is a maintenance to do filename called, OIL CHANGE, beleow this are fields called Frequencies. Frequency A is called Check Oil Levels and is set to 50 hours. Additional frequencies have also been set up, with two showing in red, indicating the maintenance is overdue.
Edit to Do
You have the option of creating a to list for what needs servicing at different frequencies. When you click the Edit to Do button a blank word document will come up were you can create a to do list for that frequency.
a. When you click the Edit to do button, (if you already have a document created, it will populate). If you do not, it will show you the following message.
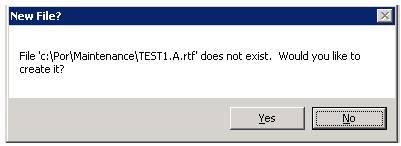
b. Select Yes. A word document will open where you can create the Edit to Do.
c. If you are importing a PDF document, you will need to answer YES to create the document. The file will be saved to c:\por\maintenance, delete the text document filename.A.rtf and rename the pdf with the .A after the filename.
ex. In example above the file name being created is TEST.A.rtf go to c:\por\maintenance delete the file TEST.A.rft and rename the PDF file TEST.A.PDF
* Note - The file name is based on the frequency. If the Edit to Do is being created for frequency B then the filename would be TEST.B.rtf and the renamed PDF file TEST.B.PDF
Print to Do
Allows you to manually print out the Edit to Do for the scheduled Maintenance. Once the Edit to Do is created and saved the Print Maintenace will appear in BOLD, you can select which printi maintenance you would like to have printed. If the IMO box is checkedk when setting up the scheduled maintenance, the the edit to do will automatically print out.

4. From the counter system, enter your ID. In the upper left corner of the screen, click on Tools, then select Maintenance Due. You may choose a store or all stores. If you enter a percentage items that are not quite due for maintenance will be shown. When your mechanic comes to you and says he has nothing to do you can enter 5% and keep him/her busy for days. You can left click an item to open the Maintenance screen or you can right click for additional options.

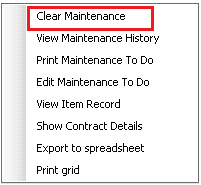
5. Right clicking on the item needing maintenance will bring the following menu. Click “Clear Maintenance”.
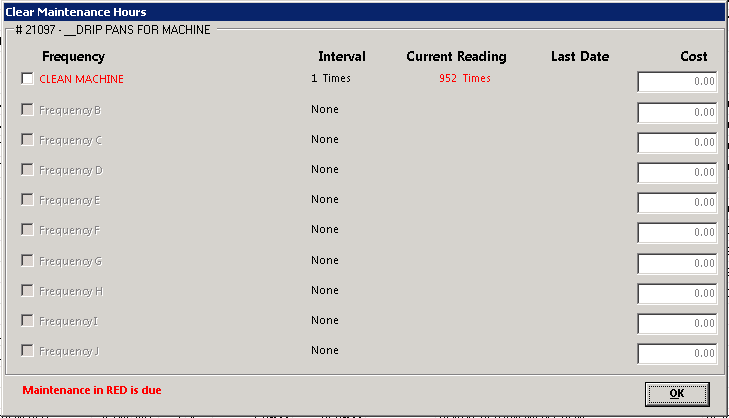
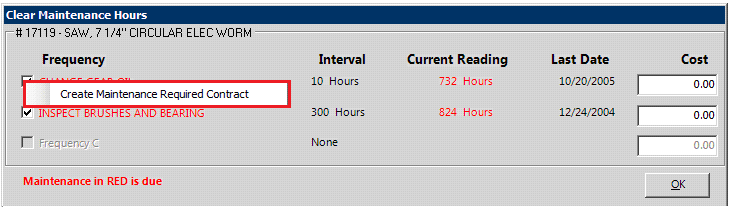
6. Check the box of the frequency to be completed.
7. Do NOT click “Create Maintenance Required Contract”.

8. Check Create Maintenance Required Contract. And enter in the cost of this maintenance. A Maintenance Order will be added for the item. Click OK when finished.

9. Enter in the meter reading, serviceman and any comments if desired, click OK and the maintenance will be cleared.

10. Viewing the item record in File Maintenance shows what has been done and the cost that was entered. The Total Cost will show the accumulated cost for each frequency.

11. Check the maintenance that you have completed and select OK. Right clicking a schedule will allow you to manually create an IMO. If you are auto creating the IMO from the maintenance setup screen there is no need to create the IMO from here.
12. Next you will need to complete the details about the maintenance performed. This information will be saved in the history of the item record.
*Note: From the Item Record you can retrieve a list of past maintenance that has been completed in this manner.
If you repair equipment for your customers you can setup maintenance schedules for their equipment. When service becomes due you can use the maintenance due list to contact your customer to schedule the service instead of waiting for them to call you.