The Customer Listing Report prints the customer’s key, number, name, address, and phone number for all selected customers. The report can be sorted by customer name, key, number, or lifetime income. Once the report is displayed, you will be able to export to a excel spreadsheet by selecting from the list of icons listed at the top of the page.
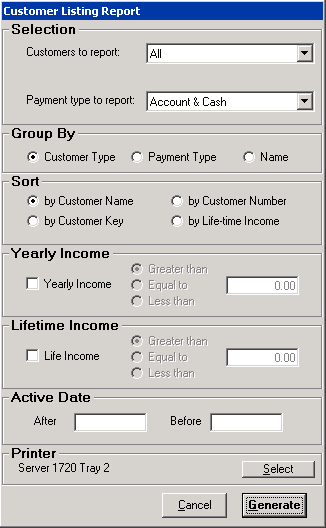
When you select Customer Listing Report, you will get the following screen:
Customers to Report – this option allows you to select only certain customers based on their restriction such as Allow Over 30 Days, Allow Over 60 Days, Allow Over 90 Days, Undesirable, Pay on Return, No Deposits, Account Closed, or Account Not Closed.
Payment Type to Report – this option allows you to select only certain customers based on their payment type: Account customers, or Cash customers, or both.
Group By – this option allows you to select how the customers are grouped together.
Sort – this option sets which column the report is sorted by: Customer name, key, number, or lifetime income.
Yearly Income – this option allows you to report customers that fall within a particular income level. Once you check mark Yearly Income, you will be able to select Greater than, Equal to, or Less than and then enter the appropriate income level in the box.
Lifetime Income – this option allows you to report customers that fall within a particular income level. Once you check mark Yearly Income, you will be able to select Greater than, Equal to, or Less than and then enter the appropriate income level in the box.
Active Date – this option allows you to select customers that have been active within a certain date range. If you want to select all customers that have been active since January 1, 2006, then enter 1/1/06 in the after box and leave the before box blank. If you want to select all customers that haven’t been active since December 31, 2005, then enter 12/31/05 in the before box. If you want to select all customers that have been active from January 1, 2006 to June 30, 2006, then enter 1/1/06 in the after box and 6/30/06 in the before box.
Printer Select – this button defines the output printer for the report.
Cancel – this button will cancel your selections and return you to the Program Menu.
Generate – this button will generate the report and display it on the screen. To print the report, click on the printer icon at the top of the screen after the report is displayed.
The report will look similar to the following sample report
