
2. If an item is returned from a rental and is in need of repair, you have the option of creating an IRO after printing the closed invoice. As illustrated below, click on Create IRO.
3. A new box will pop up showing all items rented on the contract with a check box. Select the broken item and click the Proceed button. If you are an equipment store and wish to track cost, only put one item on the IRO. If you are an event store and simply want to pull multiple items out of inventory and do not wish to track cost (like linens while they are getting washed), then you can select multiple items.
• When creatin an IRO for a broken item, when closing the contract, the Item Key will be displayed as well as the Item Name.

• Note – If multiple items on a contract are marked to creat an IRO when closing the contract, the coutner person will be asked whetehr they wante a sperate IRO for each item or just on IRO for all the items grouped together.
Creating an IRO from the Counter System Menu
4. From the Counter System Menu choose New Contract then Internal Repair Order.
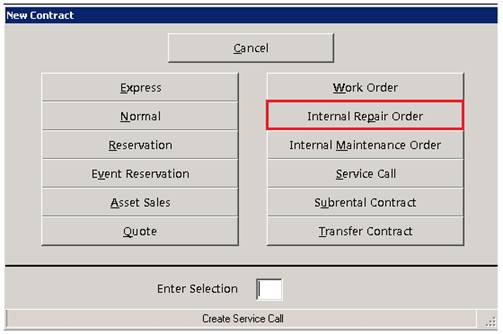
5. You will be shown a list of repair customers to choose from. Since this is an IRO and you are taking the item out of service, make sure you do not select a Maintenance customer (this will not take the item out of service; it will create an internal maintenance order).

6. Next, add the item to be repaired (if you opened the IRO at contract closing the item will automatically be selected). You will be prompted to enter how long the item will be out of commission; as a general rule it is good to select one month to ensure you are not overbooking an item that has not been repaired.
7. You can now add parts and labor to your repair contract. The cost associated with the parts and labor will be shown as the price and subsequently added to the repair cost in the item record. If you need to add a part that you do not carry in Inventory, click on the Add Part Item pull-down and choose Special Order.
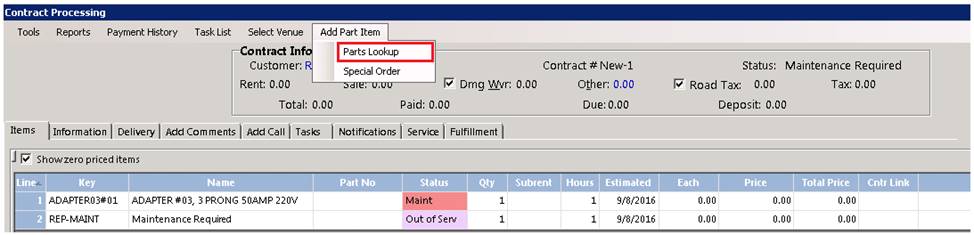
8. You will be prompted to create your Special Order Part. The only required field is the name, but we recommend you include the purchase price and, if you use the Purchase Order module, the Vendor.

9. If you have the PO module, you can create a purchase order for the special-order parts by right-clicking on the line in the processing screen and selecting Order Item (Illustrated below).
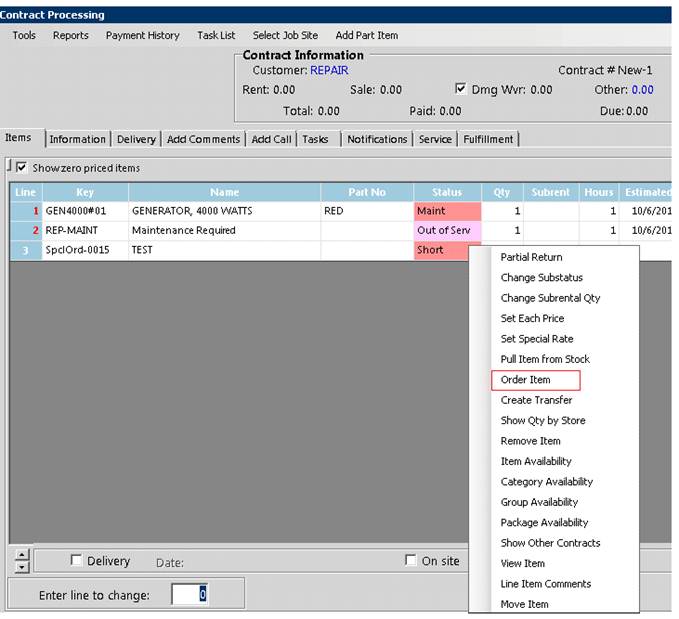
10. You will see a message saying a purchase order has been added and it will give you the PO number.
11. To track the repair progress, you can click Select Operation in the contract processing screen. Point-of-Rental has five operations pre-set: Waiting on diagnosis, Waiting on parts, In repair, Repair complete, and Billed customer.

12. You can add new operations by going to #9: Configuration, then Transaction Configurations and then Contract Operations.
13. When the equipment is fixed, you can close the IRO like any other contract and it will put the item back in service.
Creating a Customer Bill
From within the Internal Repair Order, You can create a Customer Billing if you find out customer was responsible for the damage. You can click on Tools and select Create Customer Billing.

•Note – When creating an Internal Repair Order for repairs of the an item, then decide the customer was at fault and want to bill the customer, You can click the Tools, Bill Customer. The historical repair cost shows the repair costs that the customer actually paid. To keep your historical reporting in line, when billing the customer for damage the Reports contract will be zeroed out.