
This selection is used to “write” the initial rental and/or sale contract, reservation or quotation.
From Counter System, select Open Contracts, you will be prompted to select the type of contract to be written from the following menu:
Express Contract – To Rent/Sell items quickly to a cash customer. This process will ask once for time period and will not have a qty prompt for serialized items.
Normal Contract – Normally used to rent and /or sell items.
Reservation – Must be used to reserve items for rent and/or sell. * You will be prompted to enter the Reservation Pick Up date and time.
Event Reservation – Used to reserve items for rent and/or sale. * You will be prompted to enter the Event start and end date.
Asset Sales - Used to sell rental assets
Quote - To create a quotation that can be printed, faxed or emailed
Work Order - Used to bill a customer for work you completed (service, labor)
Internal Repair Order - Used to take internal inventory out of stock for repair
Internal Maintenance Order - This allows you to schedule and take inventory out for Maintenance
Service Call - This option lets you schedule a service call for items on rent.
Subrental Contract - This allows you to create a subrental contract when subrenting inventory from another store
Transfer Contract - Allows you to transfer inventory from either store location or to a service truck.
Customer Record
The customer may be easily retreved by entering any Search Key which is either the Customer Key, Name, Driver License, or their computer assigned Number in the Customer Lookup fields follwed by ENTER. The customer may be looked up through Filed Search by selecting the desired field to search and typing the search word in the “Containg” field followed by ENTER.
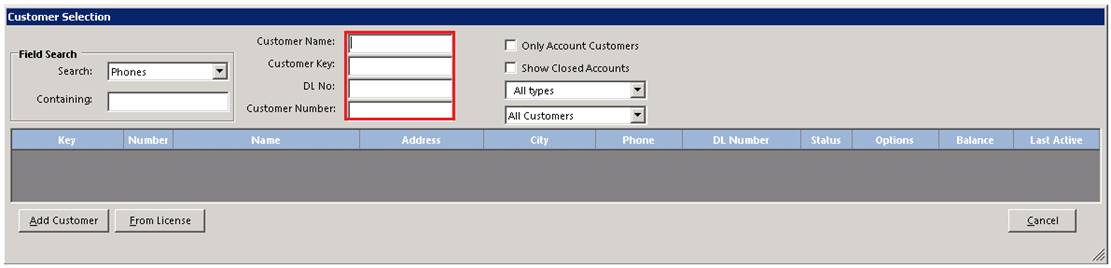
If the customers record is not found, a list of customers in alphanumerical order by search key beginning with the next closes search key will be displayed. The display will have the following options:

Add Customer - If you wish to enter a new customer and do not have a License Swipe reader. A record will be displayed so the athe customer’s biographical information can be typed in. Information must be entered in the customer name and driver license fields; entry in the other fields is optional.
From Internet – If you are adding a new customer from their telephone number. The system will check for biographical information from the Internet based on the customer’s telephone number. If the customer’s information can be found, the cutomer’s record wil lbe displayed with the address, city, state, and zip code filled in. If the customer’s information can’t be found, a blank record wil be diplayed just like under the Add Customer option.
From License – If you have a magnetically encoded driver license for the customer and a License Swipe reader, a 2D barcode reader or the OCR license scanner. The License Swipe software will automatically enter all of the pertinent information from the license into the new customer’s record. If the license is missing data, you will get an error message at which point you can type OK and enter in the missing data manually.

If you needed to add a new customer and don't have an OCR scanner, this window will come up empty. This is where you can fill in the customers data. By putting the phone number in the "key" field it gives a quick and unique way to identify the customer. It also automatically populates the primary phone number field on the right. Once the OK button is clicked you will be taken to the menu below.

• Note – The system tries to prevent the same customer from being entered into the system under two or more different records.
o Ex. If you enter a new customer so that one of the Search Keys matches an existing customer, that customer record will be displayed with a message “Customer Already Exists. Use existing Customer? If you affirm, you can update that customer’s information. Otherwise two records will be in the system wiith exact matches either for the customer Name or Driver Liceense. You will not be allowed to put in another customer record if one already exists matching the customer Key, customer Number or customer Drivers License. If you change an existing customer’s record so that the driver license is duplicated, you will be warned that the customer already exists. You will then be given the option to merge the curerent record with the existing customer.
• Note1 – If an account customer is retrieved whose credit limit has been exceeded, you may be required to enter a password to proceed with opening the contract. An entry into the Transaction Summary will be made indicating the customer number and what password level authorized the override. In similar fashion, you may be restricted in opening a contrat if a customer has a balance due that is dated more then 30,60,90 days depending upon how restrictive management has set these.
Inventory Selection
You may enter the Item Key or the first few characters of the Item Key for th item you want to rent or sell. If you are not sure of the Item Key, you may put the cursor in the Item Name, part Number, Item Number (computer assigned), or Search fields and use them. Under Field Search, you can search a particular field for a certain word or phrase anywhere within the field.
Search Lookup – used if you have no idea of the item key or exact name.
Field Search - this looks anywhere within the field you select for the search string you enter. Select the desired search field from the drop down box, then type the search string in the containing box followed by the Enter Key.
Category Search – You can select a specific category to be displayed.
Rental Items – with this box checked, rental items matching the search will be displayed.
Sale Items – with this box checked, sale items matching the search will be displayed.
Parts Items – with this box checked, parts items matching the search will be displayed.
Zero Qty – with this box checked, all rental items will be shown, even if they have zero quantity.
Serialized Items – with this box checked, each serialized item along with their header item an non serialized items will be displayed.
Component Items – with this box checked, each component item will be displayed.
Inactive - with this box checked, all items marked all items will be shown even if they are marked as inactive.
Shared Inventory - with this box checked, all shared items will be shown as wll as the items from the store selected. Shared items are designated with “000” in their Home Store field.
Store to Display – Allows a specifc store’s inventory to be displayed.

If an extra match is found, that item will be displayed. Otherwise the items immediately following the key that was entered, sorted in alphanumeric order will be displayed.
The item you want may then be selected by highlighting it using the Up/Down arrow keys followed by ENTER or by a left click with the cursor over the item if you prefer usiing a mouse. By clicking the Show More button, more items will be listed from the last item key forward. When you want to exit, press ESC key or the Cancel button.
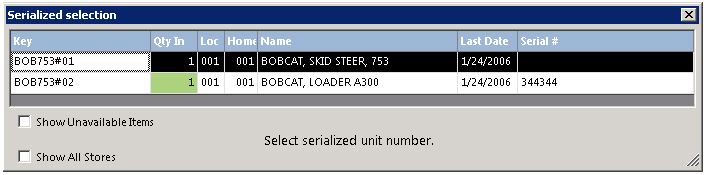
When a "Header" item is selected, Point-of-Rental lets you choose which serialized item you would like to put on the contract. This is so you can keep track of which individual item went out on a rental in order to ensure it is given the proper service when it accumulates enough hours or rentals. This provides other valuable information as well, such as return on investment.
•Note Header record will be entered on a Reservtion contract, When the reservation is sent out, you will be prompt to select the serialized item. On an Open contract you would enter the serialized contract.
When a serialized item is selected, Point-of-Rental then places that item on the contract. It then takes you back to the same "Inventory Selection" menu where you are able to add another item and repeat the process. Once all of your items have been selected, Click on the cancel button to get back to the inventory selection screen.. This gives us the contract screen below with the customers name, the rental items listed, how much they owe, and when the item is due back.
Note - If the item is not currently available, you will be warned but given the option of renting or selling the item anyway. If you process the item, you will continue as if the item was available in the computer. Otherwise if the item has the all wait list option selected, you will be asked if the customer wishes to be put on the waiting list. This does not apply to Quote contracts.
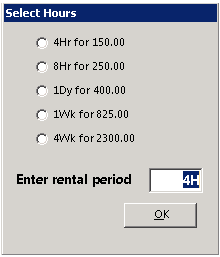
You will asked to specify the estimated rental time period. This must be entered in the format xH, xD, xW, xM where x respresents the number of Hours, Days, Weeks or Months.
Next you will be asked to enter the quantity to be rented or sold. Except for quote and reservation contracts you will not be allowed to specify a quantity greater than the quantity currently available.
Note – For reservation contracts you will be able to enter up to the quantity owned plus the quantity in the subrent field. If you enter 0, it is assumed that you have changed your mind about this item and it is canceled.
Contract

• Note – Depending on the type of rental item you are entering on the contract, different options screens will appear.
Rental Item – Rental Item will be added to the contract.
Rental Header – Message will prompt you to enter a serialized item. Header records are only entered on a Reservation Contract.
Rental Usage - Message will prompt you to enter the outgoing usage reading. When the item is returned, you will enter the incoming usage. (Customer will be charged the differnce).
Rental Meter - Message will prompt you to enter meter reading in tenths of hours each time the it is rented or returned.
Rental Suggested – You will be asked to select from a list of items you created in File Maintenance, that go along with the item being rented. (Ex. Tent, Walls, Window Walls, Lighting)
Rental Package – Items will be entered on the contract that are pieces, making up the item being rented. (Ex. Dance floor sections, trim, under pad.)
Rental Accessory – Item that goes along with the main item being rented. (Ex. Auger, Auger bit)
After all items have been selected press the ESC (ESCAPE) KEY or click the Cancel button on the Item Lookup window to display the contract.
Tools
Set Credit Card – This allows you to enter and
store customers credit card information.
Change Contract Store – Allows you to change the contracts store location. You will see after the contract number the new store location.
Change Item Store – Allows you to change the items on the contract to or from a different store.
Add Asset Sale – Allows you to add an asset sale item to the contract.
Set Contract Price – Allows you to set the over price for the contract. You can set by ( Rental Amt, Sale Amt, Rental & Sale Amt, Total with Tax). You also can reset the pricing back to either standard pricing or recompute prices to today’s pricing.
Track Shipment – Allows you to track shipment of order that were placed.
Export to Spreadsheet – Exports items on a contract to an excel spread sheet.
Reports
Transaction Edit – Allows you to see all edits made to the contract. This will list the Date, Store, Action Taken, Operator, Contract Status, Payment Method.
Related Contracts – This will list all of the contracts that are associated with this contract such as every continued contract.
Print Instructions – Allows you to attach instruction file to be printed out with the contract. (see instructions file on how to create.)
Posted to Totals – Exports items on a contract to an excel spread sheet.
Payment History
Payment Report – Allows
you to see payments taken on the contract and select how you would like to view
payments by rental/sale or by deposit. Payment History will display date
and operator who received the payment and store location were the
payment was taken, along with the customer credit card information.
Task List
Create Reminder – Allows you to created a reminder
to yourself or other employees.
Task Assigned – Allows you to assign a task to yourself or to other employees
Select Job Site
Select Job Site – Allows
you to select a customer job site for a customer for the contract an will be
added to jobsite under the delivery tab.
Change Status
When opening a new contract, you
can change the status of the contract by clicking on Change Status at the top of
the contract processing screen. You can change the contract from a Quote or
Reservation. If you get to the payment screen and then need to change the status
just click the Back button to return to the contract processing screen. This is
only an option on the Opening of a contract. Once the contract has been assigned
a customer number you will need to use the normal methods.
Functions:
Rent - The TOTAL price of all rental items on the contract
Sale – The TOTAL price of all Sale Items on the contract.
Damage Waiver Amount - The TOTAL amoun of damage waiver charges for the contracts. Note: To waive the damage waiver on the contract, uncheck the damage waiver box.
Other Amount – The TOTAL amoun of ‘other’ charges on a contract. Ex. Fuel, Cancel Reservation Fee, Finace Charge.
Item Percentage – This is an optional charge. It can be used for State Road Tax, EPA Fee or GST tax.
Tax Amount - The TOTAL tax amount for the contract. Note: If the “tax code” field in the customer’s record is set to non-taxable, the tax amount will be set to 0 whena contract is opened for that customer.
Total – The TOTAL of Rent, Sale, Damage Waiver, Other and Tax.
Paid – The TOTAL amount(s) paid
Due – The TOTAL amount due excluding deposits.
Deposit – The TOTAL of all deposits being held for this contract.
Date/Time In - The date and time out for this contract or if this is a reservation, this is the Date/time anticipated to go out.
Show Zero Priced Items – With this option checked all itms with zero price will be displayed on the screen. For larger contracts with component items such as tents, you will probably want to uncheck.
Display Overbooks - With this option checked each item on the contract will be checked for overbooking conflicts. Since overhead can be substantial on larger contracts, ucncheck this box when making modifications.
Company Overbooks – With this option checked, overbooks will be done for the entire company.
Selecti Operations – This option will diplay the list of Transaction Operation you created under Configurations.
Delvery/Picku Up – If either of these boxes are checked, you will be prompted to enter a Delivery or Pickup time and date. If they are not checked, the contract will be treated as a Will Call for the customer to pick up.
Items Tab
Once the line items are displayed, you may make any necessary changes by entering the line number to be changed or by double clicking on any field. If you enter by line number you must choose a column heading to change Status, Quantity, Hours, Date-due, Time Due, Price, Discount Amount, Discount Percentage, Order – Sort, Price Each, or Cancel.
• Note – Status is an option only if the line contains rental items. If you select Cancel you will be asked to select a line number again. Some changes can only be made if you are modifying or closing a contract, NOT when opening a new contract. Changes are made and interpreted as following:
Line - The line number for a rental/sale item
Key – The key field for the rental/sale item
Name – The descripitive name of the rental/sale items:
Status (Line Item) The definition of the Status of each line item:
Delivery Delivery charge item (gray background)
Hold Rental time stopped (white background)
Labor Labor item (gray background)
Out Open rental item (green background)
Overbooked Reserved rental item that is overbooked (red background)
Quoted Rental item quoted (blue background)
Reserved Reserved rental items (yellow background)
Reserved OK Reserved rental item-adequated quantity (yellow background)
Returned Closed rental item (red background)
Selling Sale item reserved not yet sent out (gray background)
Sold Sale item (gray background)
Sold Asset Sold a rental item (gray background)
Changing the status is not allowed when opening a contract or from sales items. Otherwise, you may select “Open” or “Close”. “Open” would be used to reopen an item that had been previously “returned” by mistake. You many also need to change the Hours coulumn to correct the rental period. “Close” would be used to indicate that a rental item has been returned. If you change the Status of a metered item you will asked to enter the current meter reading in tenths of an hour. If the Status is in italics the the item is a non-taxable item.
Quantity - Use to change the quantity of a rented or sold item. This number must be the TOTAL quantity rented or sold. Most often it will be used to change the quantity of sales items. For example, if someone bought 10 sanding belts and later returned 2 of them, you would change the quatiity to 8. When opening a contract, you many set the quantity to 0 to cancel an item. The quantity of a rental item may nto be changed if the item has been returned When modifying or closing a contract, you may change the quantity of an open item, but you must be aware of the following restrictions:
(a) If the item has a standard fuel charge and/or deposit, these will not be re-computed when you change the quantity. However, you many change them manually.
(b) The “times out” and “hours out” fields in the item record may not be updated correctly because they are dependent on the quantity.
(c) The price will be re-computed using the new quantity. The rental period and due back date/time will remain the same. You must change these manually if desired.
(d) It is possible to change the quantity to 0. This should only be used if you wish to cancel a line item that was rented out by mistake.
•Note: The abilty to change the quatity of a rental item is intended ONLY for correction mistakes on the original contract. DO NOT use it as a substitue for closing line items. If you wish to give a full refund on an item, the proper procedure is to close the item to return it to inventory the override the price to 0.
Hours: Can only be change for rental items. You will be asked for the rental tiem period in the format xM, xW, xD, xH. You may also specify nOor nC to override the due back time. If the item is closed, you may specify the time period to the minute by using the format x:yH where x is the number of hours an y is the number of minutes. For example 1W, 2D4:45H means 1 week plus 2 days plus 3hours and 45 minutes.
Due Date: You will be asked for the new due back date an time. Only permitted for rental items. If you change this to a date or time your store is closed, you will be warned and allowed to re-enter.
Note: Changing due date does NOT update the price of a rental item. To automatically update due date and the price, change the hours.
Tine Due: You will be asked for the new due back tiem. Only permitted for rental items. If you change this to a time your store is closed, you will be warned and allowed to re-enter.
Note: Changing due date does NOT update the price of a rental item. To automatically update due date and price, change the hours.
Price: You will be asked for the new price, the default being the current price. Not allowed if the quantity has been changed to 0. If the price is in bold, the a special rate has been defined for this item. To see or modify the special rate, right click on the item. Then click “Show Special Rate” or “Set Special Rate”.
Discount Amount: You will be asked to enter the discount given for the line item. You can enter up to the line item price.
Discount Percent: You will be asked to enter the percent discount given for this line item. You can enter up to the maximum discount allowed for this store as set in parameters.
Sort Order: You can set the order in which the tims print out on the loaser printed contract form.
Right Clicking on any line item, a menu will be displayed with the follow menu options:
Partical Return: This option allows you to return a partial quantity of the items If this is a sales item, then a new item will be created with a negative quatity. If this is a rental item, a new line item will be added with the quantity returned an the original line item will be decreased by the quantity you enter.
Asset Sale: This option is used to sell the item to the customer. If you select Asset Sale, you will requested to enter the quantity being sold. Enter the correct quqntity. Note; Asset Sale and Breakage accomplish the same thing.
Breakage: This option is used if the customer breaks some of the items. If the customer broke some wine glasses, then right on the item and left click on Breakage. You will the be requested to enter the quantity broke. Enter the correct quantity. A new line item will be added to the end of the contract selling the broken items to the customer. Note: Asset Sale and Breakage accomplish the same thing.
Exchange Item: This option allows you to exchnge one serialized item for another serialized item of the same kind. This option only functions on serialized items. If you want to exchange Bobcat-A for Bobcat-B, then right click on Bobcat -A and then left click on Exchange Items. When all of the serialized bobcat are displayed, select Bobcat-B. The system will close out Bobcat-A and chang the price to zero.
Close Item: This will close out the line item on the contract, returning the item to inventory.
Change Substatus: This option allows th Transaction Item Substatus to be changed.
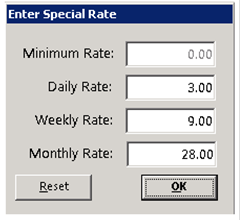
Set Special Rate; this option allow you to set a different rate structure for this item on this contract only. You can set a mininum rate, daily rate, weekly rate, and monthly rate. The rates entered in to the time record will be the default rates. Any of the rates can be rasied or lowered from the standard rate. The entry screen similar to the following will be displayed.
Show Qty by Store: This option will show you the quantity owned and out at each store location.
Create Service Call: This option will create a service call contract on the specified line item.
Remove Item; This option will remove the item from the contract. If the item was just added, the item will be completely removed for the contract. If the item was added previously, the quantity of the item will change to zero.
Suggested Item: This option will show any items that have been added to the suggested items fields in file maintenance for this item.
Item Availabiltiy: This option will show the availabilty for this item for each day of the week.
Category Availability: This option will show the related item availability for each day of the week.
Pacakage Availabiltiy: This option will show the items making up the package of the item for each day of the week.
Show other Contract: This opton will show any other contract that this item is on.
View Items: This option will show the file record of the item.
Line Item Comments: This option allow for one line of comments to be entered for the line item. Theses comments will be printed on the contract directly below the item.
Move Item: This options wil allow you move over the item line order. Ex. Was on line 3 move to line 5.
Select All Lines: This option allows you to select all lines on the contact.
Unselect All Lines: This option allows you to unselect all lines on the contract.
Break Into Two Lines: This option allows you to take quantity from one line and break it out moving a particle amount to another line. This is handy if you need to group your items by set up area. Ex. 100 chairs, can be broken down to 70 on line one 30 on line two.
Add Button: Allows you to add additonal items to the contract
Enter line to change: This allows you to change the order of the line items on the contract. Select from the drop down menu. You will be given the option of changing (Status, Quantity, Hours, Date Due, Time Due, Price, Discount Amount, Discount Percentage, Order-Sort, Price Each, Cancel).
If everything looks ok, you can then click OK at the bottom of the above screen. It will take you to the window below.

The payment screen initially requires you to put in the amount of money you are requiring from the customer. You can simply put zero for the amount and finish the contract if you only require payment upon return. For this example the customer paid the full amount up front.

If you chose to take money from the customer POR will then ask you how they are paying. The options here are by cash, check or credit card. Select one and click OK.

Your contract is completed and you can choose how many copies you wish to print. From here you can also email or fax a copy of the contract directly to another party.

This is the last screen displayed. From here you can return to the counter menu or go back into the contract to correct anything. "Clone Contract Header" is an option available to duplicate the customer information, taken you back to the open contract screen, where you can select (Express, Normal, Reservation, Event Reservation, Asset Sale Work Order, IRO, IMO, Service Call, Subrental, Transfer) keeping the same customer or selecting a new one.
This is just one of the many How Tos readily available in Point-of-Rental systems. They range from operations as simple as writing a contract, to correcting a customer account payment or selling off an asset.