This selection is used to “write” the initial rental and/or sales contract, reservation or quotation.
Note: Repeat customers are the backbone of most party and general rental centers. In addition to account (charge) customers, the system is designed to automatically store biographical information on cash customers once their information has been entered. All customers must be assigned a unique Customer Key. Most stores use a ten-digit telephone number for the Customer Key for cash customers and a partial of the account name for account customers. Other stores use driver license numbers or social security numbers for the Customer Key. Please check with your store management as to the protocol they have selected.
Enter your option based on the type of contract you want to write. Details of each option follow:
CANCEL
Purpose: To return to the Counter System Menu.
EXPRESS
Purpose: To rent and/or sell items quickly.
Assumptions:
Not a reservation
Normal deposits will be suggested
Quantity 1 on all rental items, sales item’s quantities are specified
Rental items will be for their defined minimum rental period
Rental items may NOT be sold.
NORMAL
Purpose: Normally used to rent and/or sell items.
Assumptions:
Not a reservation
Normal deposits will be suggested
Quantities are specified for both Rental and Sale Items
Rental periods are specified
Rental items may NOT be sold
RESERVATION
Purpose: Must be used to reserve items for rent and/or sale.
Assumptions:
Specify date/time anticipated to go out
Specify if this will be a delivery or not
Otherwise just like Normal (above)
EVENT RESERVATION
Purpose: Used to reserve items for rent and/or sale.
Assumptions:
Specify event start date and event end date
Specify the time charge for the event
Specify if this will be a delivery or not
Otherwise just like Normal (above)
ASSET SALES
Purpose: Used to sell rental assets.
Assumptions:
Specify quantities
Allows sale of rental items
WORK ORDER
Purpose: Must be used to create a work order for a customer.
QUOTE
Purpose: To create a quotation that can be printed, faxed, or e-mailed*.
Assumptions:
Normal deposits will be suggested
Specify quantities
Specify rental periods
Allows sale of rental items
For quoting purposes only
You may save the quote so that it may be converted to a reservation
* - Requires e-mail software such as Microsoft Outlook® be installed on your system.
Once stored, the customer may be easily retrieved by entering any Search Key which is either the Customer Key, Name, Driver License, or their computer assigned Number in the Customer Lookup fields followed by ENTER. The customer may be looked up through Field Search by selecting the desired field to search and typing the search word in the “Containing” field followed by ENTER.

If the customer's record is not found, a list of customers in alphanumerical order by search key beginning with the next closest search key will be displayed. The display will have the following options:
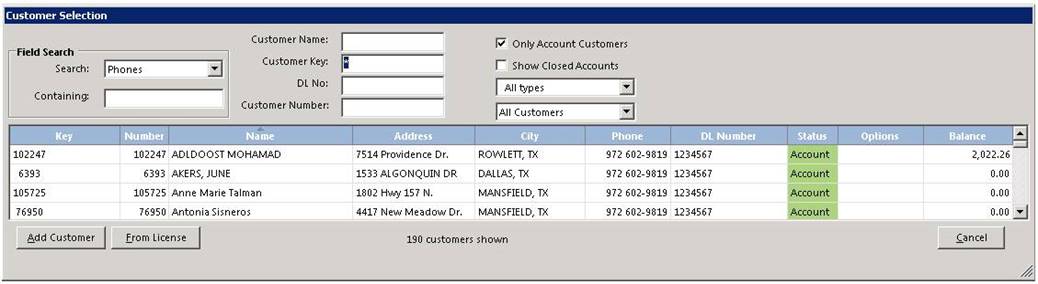
Click “Add Customer” if you wish to enter a new customer and do not have a License Swipe™ reader. A record will be displayed so that the customer’s biographical information can be typed in. Information must be entered in the customer name and driver license fields; entry in the other fields is optional. When finished you may enter \ or / as the first character of any field or click OK to send the record to the server.
Click “From Internet” if you are adding a new customer from their telephone number. The system will check for biographical information from the Internet based on the customer’s telephone number. If the customer’s information can be found, the customer’s record will be displayed with the address, city, state, and zip code filled in. If the customer’s information can’t be found, a blank record will be displayed just like under Add Customer option.
Click “From License” if you have a magnetically encoded driver license for the customer and a License Swipe™ reader, a 2D barcode reader, or the OCR license scanner. The License Swipe™ software will automatically enter all of the pertinent information from the license into the new customer's record. If the license is missing data, you will get an error message at which point you can type OK and enter in the missing data manually.
Click “Cancel” if you don’t want to select a customer at this time. You will then continue with item selection. If you want to create the contract, you will be required to select a customer.
Note: The program tries to prevent the same customer from being entered into the system under two or more different records. For example, if you enter a new customer so that one of the Search Keys matches an existing customer, that customer record will be displayed with a message “Customer Already Exists. Use existing Customer?” If you affirm, you can update that customer’s information. Otherwise two records will be in the system with exact matches either for the customer Name or Driver License. You will not be allowed to put in another customer record if one already exists matching the customer Key, customer Number, or customer Drivers License. If you change an existing customer’s record so that the driver license is duplicated, you will be warned that the customer already exists. You will then be given the option to merge the current record with the existing customer.
Note: If an account customer is retrieved whose credit limit has been exceeded, you may be required to enter a password to proceed with opening the contract. An entry into the Transaction Summary will be made indicating the customer number and what password level authorized the override. In similar fashion, you may be restricted in opening a contract if a customer has a balance due that is dated more than 30, 60, or 90 days depending upon how restrictive management has set these under the Security tab in Parameters.
Select the Rental and/or Sale items you want on the contract.
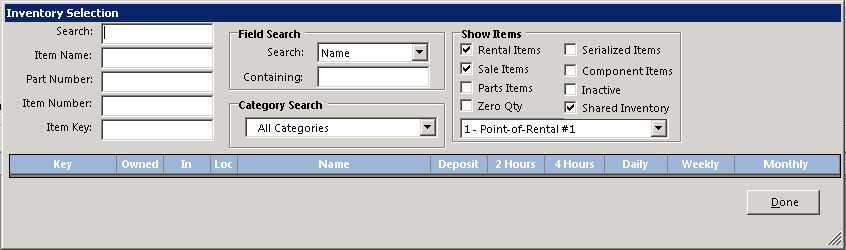
In the “Inventory Selection” screen you may enter the Item Key or the first few characters of the Item Key for the item you want to rent or sell. If you are not sure of the Item Key, you may put the cursor in the Item Name, Part Number, Item Number (computer assigned), or Search fields and use them. Under Field Search, you can search a particular field for a certain word or phrase anywhere within the field.
If an exact match is found, that item will be displayed. Otherwise the items immediately following the key that was entered, sorted in alphanumeric order will be displayed. The screen will look similar to the following:
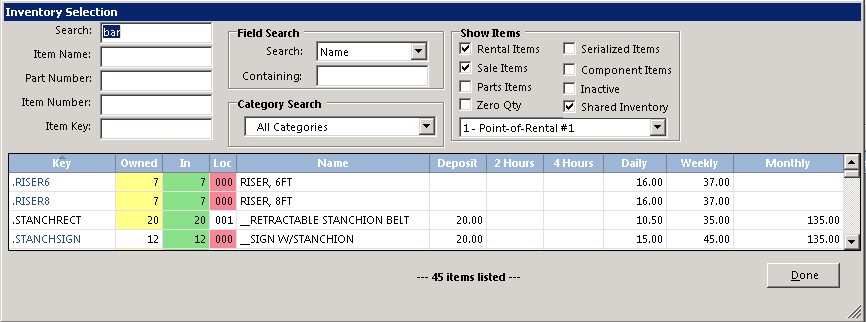
The item you want may then be selected by highlighting it using the Up/Down arrow keys followed by ENTER or by a left click with the cursor over the item if you prefer using a mouse. By clicking the Show More button, more items will be listed from the last item key forward. When you want to exit this “point and shoot” mode, press the ESC key or click the Cancel button.
If you right click on an item, the following options are available:
Select Item: This option selects the item. This is the same as clicking on that line item.
Show Contract Details: This option shows all of the active contracts for this item.
Category Availability: This option shows the availability for each item in that category for a week’s time period. The time period can be changed on the screen.

Group Availability: This option is the same as Category Availability, but only items with the same Group will be displayed. This option is only available if a Group is defined for the item.
Item Availability: This option is the same as Category Availability, but only the one item is displayed.
Quote Price: This option allows you to get a price including tax and damage waiver for the quantity and duration you select.
Show Serialized:This option allows you to select a specific unit number.
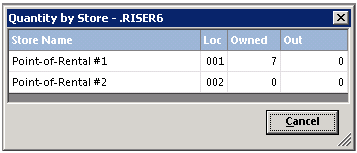
Show Qty by Store: This option gives the quantity of this item located at each location.
Show Group: This option lists all of the items in the Group. This option is only available if a Group is defined for the item.
Print Screen: This option prints the lists of all the items shown.
Search Lookup: The Search mode is most useful if you have no idea of the item key or exact name. The search mode looks in both the item name field and the item lookup field of the item records and displays any item(s) that match the keystrokes you entered in the search field. For example, suppose your item key for an engine hoist is CRANEENG and the name is “HOIST, ENGINE, 1500 Lbs.” and the lookup field has “CHERRY PICKER, LIFT, CRANE”. In the search mode, the HOIST, ENGINE, 1500 Lbs. Item would be found if any of the following were entered: HOIST, ENGINE, 1500, LBS, CHERRY, PICKER, LIFT or CRANE.
Field Search: The Field Search looks anywhere within the field you select for the search string you enter. To use the field search, select the desired search field from the drop down box. Then type the search string in the “containing:” box followed by the Enter key. All of the items that have that search string anywhere within the search field will be displayed.
Category Search: It is also possible to find items by Category Search. Selecting a specific category will display only items in that category on the screen. You may then select the item by using the Up/Down arrow keys followed by ENTER or if you prefer using a mouse, left click with the cursor over the item.
Rental Items: With the Rental Items box checked, rental items matching the search will be displayed. With Rental Items box unchecked, rental items will not be displayed.
Sale Items: With the Sale Items box checked, sale items matching the search will be displayed. With Sale Items box unchecked, sale items will not be displayed.
Parts Items:With the Parts Items box checked, parts items matching the search will be displayed. With Parts Items box unchecked, parts items will not be displayed.
Zero Quantity: With the Zero Quantity box checked, all rental items will be shown even if their quantity is zero. With the box unchecked, no zero quantity rental items will be displayed unless there is a quantity in the sub-rent field.
Serialized Items: With the Serialized Items box checked, each serialized item along with their header item and all non-serialized items will be displayed. With the box unchecked, only the header items along with non-serialized items will be displayed
Component Items: With the Component Items box checked, each component item will be displayed. With the box unchecked, only the non-component items will be displayed. A component item is designated by checking the “Don’t Print on Contract” box in the item record.
Inactive Items: With the Inactive Items box checked, all items will be shown even if they are marked Inactive. With the box unchecked, no inactive items will be displayed.
Shared Inventory: With the Shared Inventory box checked, all shared items will be shown as well as the items from the store selected. Shared items are designated with “000” in their Home Store field. With the box unchecked, no shared items will be displayed. Note: This is a multi-store option. If you have a single store, this option will not be displayed.
Store to Display: The Store to Display box allows a specific store’s inventory to be displayed. A selection of “All Stores” will list all items regardless of current store. By selecting a specific store, only that store’s inventory will be displayed. The store’s inventory is designated by the store listed in the Current Store field. Note: This is a multi-store option. If you have a single store, this option will not be enabled.
Select Item
a. For each item that you select, a series of questions will be asked. These questions will vary depending on whether the item is a rental or sales item and the type of contract that you specified.
Note: If the item is not currently available, you will be warned but given the option of renting or selling the item anyway. If you process the item, you will continue as if the item was available in the computer. Otherwise if the item has the allow wait list option selected, you will be asked if this customer wishes to be put on the waiting list. This doesn't apply to a Quote contract.
b. For Rental items, you will be asked to specify the estimated rental time period. This must be entered in the format xH,xD,xW,xM where x represents the number of Hours, Days, Weeks or Months. For example: 4H means 4 hours, 1D means 1 day, 1W or 7D or 168H means one week etc. You can also click the desired time period shown on the screen. The program will use this information to compute anticipated rental charges and when the line item is due back. However, you may override the due back time by also entering either nO or nC after the rental period, where n is the number of days from the contract date out, O means store roll due, and C means store closing time. For example, a specification of 1D,1O is interpreted as charging for one day, but force the due back time to be the next day at the roll due back time (see Calendar Maintenance). Entering 1D, 3C will charge for one day but have the item due back three days later at (C)losing.
c. Next you are asked for the quantity to be rented or sold. Except for quote and reservation contracts you will not be allowed to specify a quantity greater than the quantity currently available. For reservation contracts you will be able to enter up to the quantity owned plus the quantity in the subrent field. If you enter 0, it is assumed that you have changed your mind about this item and it is canceled.
d. After all items have been selected press the ESC (ESCAPE) KEY or click the Cancel button on the Item Lookup window to display the contract.
Notes:
1. The program automatically checks to determine if there are any pending reservations or customers waiting for the item that will create a quantity conflict. If the quantity is unavailable for the time period specified, the program will display the quantity available and the reservation and open contracts that are causing the conflict. You then have the option to overbook or reenter quantity. You may be required to enter a password to overbook an item. This option is set within Security under Parameters.
2. If the item is a miscellaneous rental or sales item, you are asked the price and a name.
3. For metered items you will be asked to enter the current meter reading in tenths of an hour. You must use a decimal point.
4. For usage items, you will be asked to enter the reading or readings depending upon the number specified in the record you are renting. The last average reading will be the default. The reading is a whole number. For example, a micrometer reading on a diamond blade of .572 would be entered as 572. The average of the entered reading(s) will be displayed. A usage item will have two lines, a rental line for the rent and a sale line for the usage.
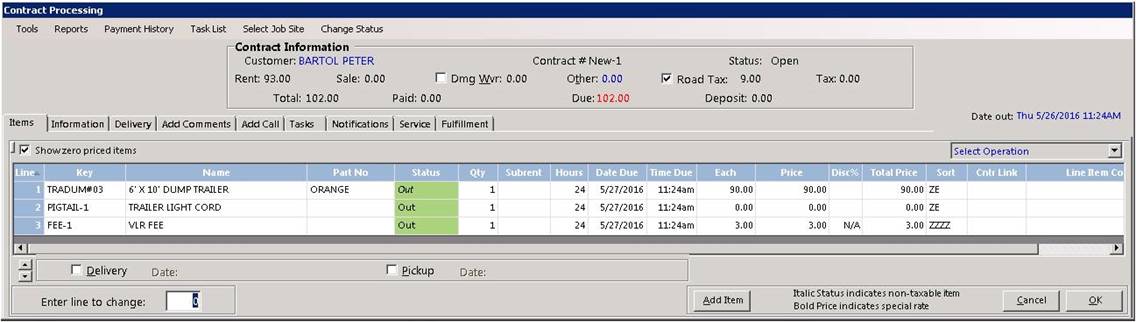
The contract will be displayed on the screen: