The Point-of-Rental Enterprise software is accessed via a remote desktop. The software is installed on a Windows Remote Desktop Server. All Windows PCs going back to Windows XP have a built-in Remote Desktop Connection application that can be configured to remote into a Remote Desktop Server. This article details how to open the Remote Desktop Connection application on different version of Windows PCs and how to configure it to remote into a Remote Desktop Server.
Windows 10
Move mouse to upper right-hand corner of the screen to get the hidden menu to appear. Click the Search button. Type “Remote” in the Search text box and Windows 8 will automatically search for all programs that start with “Remote”. Click on Remote Desktop Connection to open the application.
Once open, enter the Remote Desktop Server’s LAN IP address into the Computer text box. Enter your username in the User name text box. Click the Save As… button and save it to your desktop to easily use again later. Click the Connect button and enter your password to finish remoting into the Remote Desktop Server.
Windows 8
Move mouse to upper right-hand corner of the screen to get the hidden menu to appear. Click the Search button. Type “Remote” in the Search text box and Windows 8 will automatically search for all programs that start with “Remote”. Click on Remote Desktop Connection to open the application.
Once open, enter the Remote Desktop Server’s LAN IP address into the Computer text box. Enter your username in the User name text box. Click the Save As… button and save it to your desktop to easily use again later. Click the Connect button and enter your password to finish remoting into the Remote Desktop Server.

Windows 7
Click the Windows orb on the task bar. Browse to All Programs > Accessories and click Remote Desktop Connection.
Windows Vista
Click the Windows orb on the task bar. Browse to Programs > Accessories and click Remote Desktop Connection.
I. How to connect a Vista or Windows 7 Terminal to the POR Server
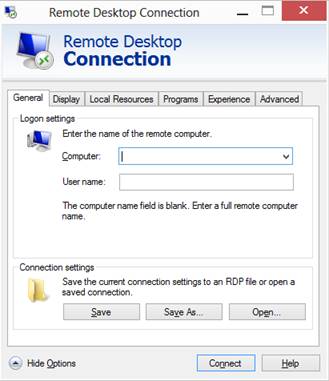
Click on Start->All Programs->Accessories->Remote Desktop Connection.
Enter the IP Address 192.168.1.5 in the “Computer” field. (the IP address for your server may be different)

Click the “Options” button in the lower left: The Window will Expand.

Click the “Display” tab at the top.
Set the Remote Desktop Size to 'Full Screen'.
Select the “Highest Quality (32 bit)” option from the “Colors” list.

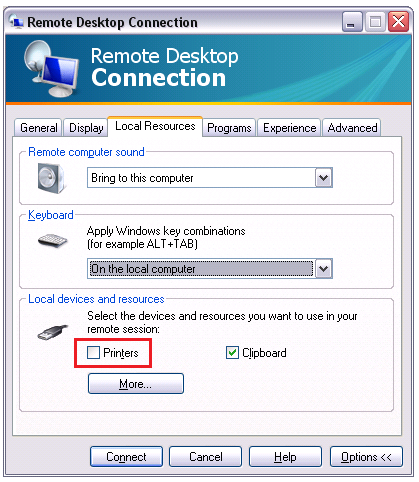
Click the “Local Resources” tab at the top.
Set the Keyboard drop-down box to 'On the local Computer'.
Remove the checkmark from the “Printers” box.
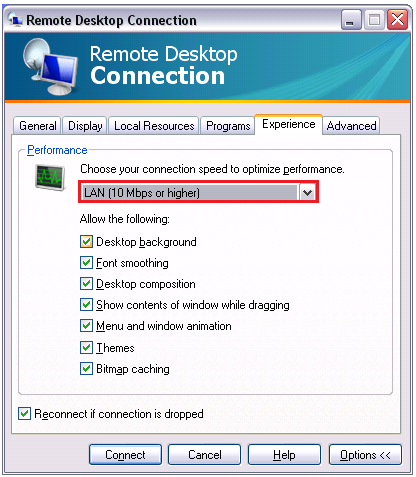
Click the “Experience” tab at the top.
Select the “LAN (10 Mbps or Higher)” option from the “Performance” list.
Click on the “General” tab at the top.
Click the “Save As” button.
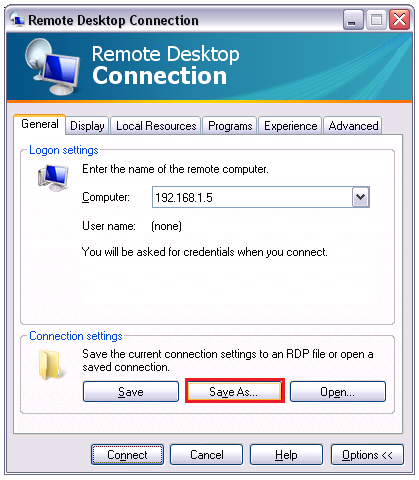
Choose the “Desktop” as the location to save to by clicking the “Desktop” button on the left or from the “Save in:” selector at the top. Type “Name of Company Server” (Ace Rental Server) ex.for the filename and click the “Save” button.
A Vista PC’s Save As screen may look different. The user may have to click “Browse” in order to have the ability to save it to the Desktop.

You can close the current screen or click connect. You will end up with an icon on your desktop that you can just double-click to connect to the server next time. When double-clicking the new RDP icon you will be prompted for your username and password for the server. You can opt to save your credentials at this time. Only do so when physical access to the terminal is in a secure location (this is not recommended in the warehouse or shop area).
Windows XP
Click the Start button on the task bar. Browse to Programs > Accessories and click Remote Desktop Connection.
II. How to connect a Windows XP terminal to the POR Server
Click on Start->All Programs->Accessories->Communications->Remote Desktop Connection.
Enter the IP Address 192.168.1.5 in the “Computer” field. (the IP address for your server may be different)
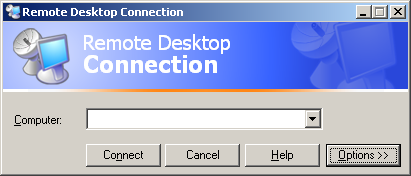
Click the “Options” button in the lower left: The Window will Expand.
Enter a UserName in the “UserName” field. (Each computer needs a different username).
Enter the password into the “Password” field. Only do so when physical access to the terminal is in a secure location (this is not recommend in the warehouse or shop area).
Leave “Domain” blank.
Check the “Save my Password” box if desired

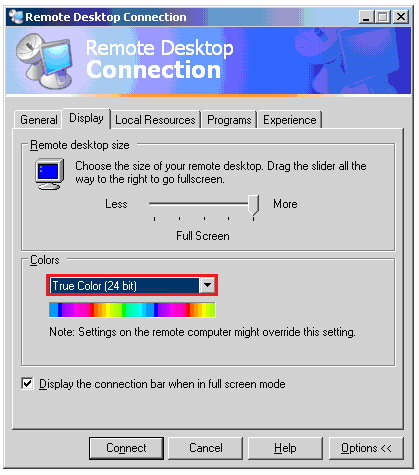
Click the “Display” tab at the top.
Set the Remote Desktop Size to 'Full Screen'.
Select the “True Color (24 bit)” option from the “Colors” list.
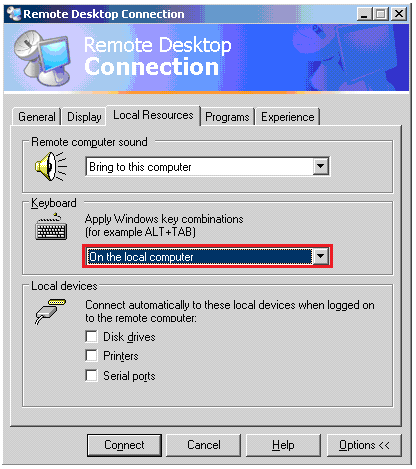
Click the “Local Resources” tab at the top.
Set the Keyboard drop-down box to “On the local Computer”.
Remove the checkmark from the “Printers” box.
Click the “Experience” tab at the top.
Select the “LAN (10 Mbps or Higher)” option from the “Performance” list.

Click on the “General” tab at the top.
Click the “Save As” button.

Choose the “Desktop” as the location to save to by clicking the “Desktop” button on the left or from the “Save in:” selector at the top. Type “Point-of-Rental Server” for the filename and click the “Save” button.

You can close the current screen or click connect. You will end up with an icon on your desktop that you can just double-click to connect to the server next time.
Mac
Remote Desktop Connections are not normally native to a Mac so you may have to download one. If so, a quick search on the Internet for “RDP Mac” should render more than one free Remote Desktop Connection downloads. Two popular options are http://www.microsoft.com/en-us/download/details.aspx?id=18140 and http://cord.sourceforge.net/.