
This selection from the Program Menu is used when the store is closing for the day. All other terminals on the system must select the QUIT option from both the Counter System Main Menu and the Program Menu. The specific steps are:
1. You will be asked if you really want to close for the day. If you really want to close for the day and you didn’t get here by mistake, then click YES. If this is the end of month or year, you will be notified and again asked if you want to continue with the close. This is your cue to add enough paper to your End of Period printer so that it won’t run out while printing the end-of-period reports. If you click on NO for either question you will be returned to the Program Menu.
2. Next you will be asked to enter the password. If you do not know the password, just press ENTER. The program will then return to the Program Menu.
3. Enter your Operator ID.
4. The following reports will print. Note: these reports can be turned off under the Reports tab in Parameters.
a) Operator Detail Report – this report shows each contract that had money transacted and is sorted by operator name.
b) Check & Credit Card Summary – this report details each check and credit card taken during the day’s transactions.
c) Credit Card Detail Breakdown – this report only prints for systems with the Integrated Credit Card option. It shows the breakdown by Visa, MasterCard, American Express, and Discover.
d) Contracts Posted to Totals Report – this report shows every contract that affected the totals for the day.
5. The final phase of the close-of-day procedure is cash drawer balancing. You will see a screen such as the following:
Counted Drawer – Under this column type in the amounts in your drawer for each payment type.
Computed Drawer – Every time money is taken, the system adds that to the totals of credit cards, debit cards, cash, and checks. The Computed Drawer is the total amount of each payment method that the counter people rang up during the day. Note: The cash amount includes today’s cash amounts as well as the beginning cash drawer, which could include checks or other amounts from the previous night.
Difference – This column totals the difference between the Counted Drawer and the Computed Drawer.
Credit Cards – The default will be the amount of contracts that were marked as credit card payment. The default will not be correct unless all contract payment methods were entered correctly. If it is not correct, simply type in the correct amount followed by the ENTER key. Note: If your credit card amount was negative for the day, make sure you enter a negative amount (precede the amount with “-”). If you have the integrated credit card option, you will not be allowed to change this amount.
Debit Cards – The default will be the amount of contracts that were marked as debit card payment. The default will not be correct unless all contract payment methods were entered correctly. If it is not correct, simply type in the correct amount followed by the ENTER key. Note: If your debit card amount was negative for the day, make sure you enter a negative amount (precede the amount with “-”). If you have the integrate credit card option, you will not be allowed to change this amount. There is an option in Parameters to disable debit cards. If this is set to disable, you will not be allowed to change this amount.
Cash – The default will be the sum of all transactions entered with cash as the payment method plus the beginning amount in the cash drawer.
Count – If you click COUNT, you will be allowed to enter the NUMBER of each denomination of coins and bills. The system will sum the total of them for you and put that number under CASH. The screen will look as follows:

Checks – The default will be the sum of monies on contracts that were marked as check payment method.
Other – You can enter “other” amounts, such as IOU slips, unprocessed credit card slips, etc.
Deposit Checks – You can enter the amount of Deposit Checks or you can enter them under Checks. The beginning check amount for the next day will be equal to the amount entered in this field.
Show Possible Contracts – Clicking this button will show all contracts that are within 10% of the amount off. If your mistake was only in one contract, then that contract should be shown on the screen. Depending on the mistake, you can then make the changes necessary to correct it. If your mistake involves multiple contracts, then the offending contract would probably not be shown. Note: this option will only be shown if your drawer doesn’t balance.
Reports – The pull down menu has the options of displaying the Operator Detail Report, Check & Credit Card Report, and Contracts Posted to Totals Report. These are the same reports that print normally at the start of the End of Day Procedure. If you have these turned off in Parameters or just want to view them on the screen, then select the desired report.
Display – The pull down menu has the option to display the date, time, contract number, customer name, and the amount for each different payment method. This is useful if the drawer is off and you want to see the transactions that made up the computed drawer.
6. When you finish counting your money in the drawer, click the OK button. If your drawer is over or short, you will be warned; however, you can proceed. The following screen will be displayed:
7. Now that you have counted all of your money in the drawer, you must tell the computer what you are going to do with it. Normally you will withdraw some of the money in the drawer for a bank deposit and leave the rest for the next day’s starting cash. The best way to tell the system how much you are taking to the bank is by making a deposit slip. Click on Deposit Slip and all the checks you took for the day will be displayed on the screen such as below:
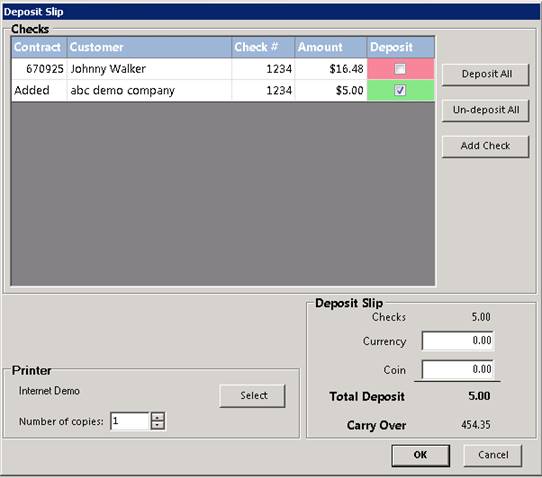
Deposit All – This button will mark all of the checks for the day as being deposited.
Un-deposit All – This button will unmark all of the checks for the day as being deposited.
Add Check – This button will allow you to add a check that was not entered during the day.
Customer – Click on this column to change the customer’s name that is on the check.
Check # - Click on this column to change the check number.
Amount – Click on this column to change the amount of the check.
Deposit – Click on this column to toggle a check from being deposited to not being deposited.
Currency – Enter the total amount of currency that you are putting in the bank deposit.
Coin – Enter the total amount of coins that you are putting in the bank deposit.
Once all checks have been marked as deposited and the currency and coin have been entered, click on the OK button. You will be returned to the Deposit Amount screen and the total amount of the bank deposit will be entered into the Bank Deposit field.

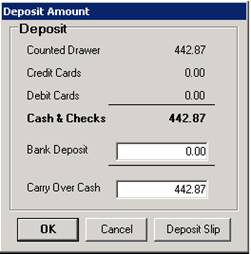
8. If you didn’t make a deposit slip, you may enter the total amount of your deposit. If you try to override the bank deposit amount after you have made a deposit slip, you will be warned and your deposit slip will be deleted.
9. If you didn’t make a deposit slip and you didn’t enter a deposit amount, you can enter the carry over amount, and the deposit amount will be computed for you. If you enter an amount for carry over and you previously entered a deposit slip, you will be warned and your deposit slip will be deleted. If you always start your drawer with the same amount, you can define a default Carry Over Cash amount in parameters.
10. Once everything is correct, click the OK button on the Deposit Amount screen. If you need to recount, click on the Cancel button and you will be returned to the Cash Drawer Balancing screen to make changes.
11. The close for the day is now complete. The following reports will print out. Note: Some of these reports can be turned off by selection that option under the Reports Tab in Parameters.
a. DEPOSIT SLIP – If you made a deposit slip, the deposit slip will print out one copy on the receipt printer and one copy on the End of Day printer.
b. RESERVATIONS REPORT – This report will print all of the reservations for the next X days. The number of days to report is set in Parameters. If this number is set to 0 then the report is not printed, but it can be printed on demand from the Reservation Report Menu.
c. DELIVERY REPORT – This report will print all of the deliveries for the next X days. See Reservation Report for details.
d. PICKUP REPORT – This report will print all of the pickups for the next X days. See Reservation Report for details.
e. UNPAID CONTRACTS – This report lists all of the contracts that are currently not paid in full.
f. OVERDUE ITEMS- This report shows all of the items that are currently overdue.
g. RESERVATION NO-SHOWS – This report shows all of the Reservation No-shows through today.
h. OPEN ITEMS- This report shows all of the items that are currently out on rent.
i. WORK ORDERS DUE - This report lists all of the Work Orders that are due through tomorrow.
j. REGISTER SUMMARY – This report will print all of the register details such as counted cash, checks, cards, etc.
k. SUMMARY OF TOTALS – This report will print the totals for the day, week, month, quarter and year. Depending upon the parameter settings, only the current period totals may be printed or not printed at all. The report is based upon the income accounting method you selected in the Parameters.
l. RECEIVABLES SUMMARY – This section will print the current sum of both cash customer and charge account receivables as well as any money in the “suspense” fund.
m. GENERAL LEDGER ENTRIES – This report is printed at the end of each month to help you enter your Sales and Receivables Journals into your General LedgerA G/L Interface for QuickBooks and Peachtree accounting programs is also generated. This report can be suppressed under parameters.
n. CATEGORY INCOME REPORT – This report will print the daily income broken down by Item Category.
12. If today is not the end of a monthly, quarterly or yearly period, the program will end now. For multi-store systems, Store #1 will automatically wait until all of the other stores have finished closing.
13. If today is the end of an accounting period, another program will be activated to print additional reports. Most of these reports can be set to print daily, weekly, monthly, yearly, or not at all under the Reports tab of the Parameters. These reports are:
a. ACCOUNT SUMMARY– This report lists all of the contracts that customers owe along with their age dates. This report can be printed for Account Customers, Cash Customers, or both.
b. ITEM INCOME SUMMARY– This report lists the item category income for the month, year, and lifetime.
c. ITEM INCOME DETAILED – This report lists each item and its income for the month, year, and lifetime and is sub-totaled by item category.
d. COST OF GOODS SOLD – This report lists each sales item sold during the month and the cost of those sales. This report is used to report your decrease in inventory.
e. INVENTORY VALUE REPORT– This report lists your entire sales inventory and the extended cost of that inventory. This report is useful to print at the end of the fiscal year for accounting purposes.
f. DEPRECIATION REPORT– This report lists your capitalized items with the extended cost, current depreciation, total depreciation, and current value.
g. CUSTOMER INCOME REPORT - Printed at the end of each year. The minimum income amount to report (in DOLLARS) must have been previously set in the Parameters. Please refer to CUSTOMER REPORTS (Chapter 12) for a description of this report.
h. SOLD RENTAL ITEM REPORT –This report is printed at the end of each month. It lists all the rental items that were sold during the month. This report is accrual based. In other words, this report is updated when a rental item is removed from your store for purchase regardless whether the customer paid his bill.
i. MONTHLY DEPOSIT SUMMARY– This report lists each day’s bank deposit, credit cards, and debit cards for the month.
After the reports have been generated at the end-of-month or end-of-year, the appropriate fields in the item and customer records will be automatically zeroed out in order to prepare for the next reporting period.
14. After all reports are complete, you will be returned to the PROGRAM MENU.