You must setup a Disbursement Item called ‘Bad Checks’ or ‘Returned Checks’ (refer to the Disbursement How To Guide) before using this method.
**Note: If the check was posted through Account Payments skip to Section II - Payment made through Account Payments.
Section I - Payment received through the contract
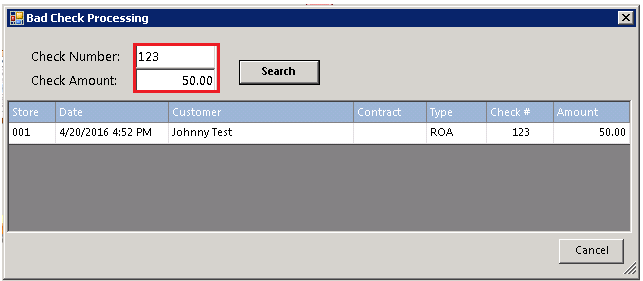
From the Counter System>Tools>Bad Check Procedure
1. Enter the check number and the amount in the appropriate boxes. You must enter BOTH.
2. Select the check you want to back out by left clicking.
Click on the customers name, you will receive a message, (Do you want to back out check # __ in the amount of $ ___)..
• Note: If you get an error message 'Error! You must use Account Payments to back out a check received through Account Payments.' skip to Section II - Payment received through Account Payments
3. Next, you will be prompted to enter the bad check service charge. The amount you enter will go into the 'other' field on the contract (the 'other' field will not generate sales tax; BE CAREFUL). You may prefer to have a Returned Check Fee item to add to the contract (marked as taxable). In that case, enter zero in the amount. When you are done with the Bad Check Procedure, modify the contract and add the Returned Check Fee item.

*Disclaimer: Anthony Sam Palasota is a fine upstanding person who has no history of writing bad checks. We used him as an example for educational purposes only.
If the customer re-submits the payment use the following to record the payment.
1. Modify the contract and take the payment as you normally would.
Section II - Payment received through Account Payments
1. From the Program Menu choose #3 Accounts Receivable
2. Select Account Payments.
3. Choose the Customer the check was originally posted to.
4. Choose Make A Payment.
5. From the Payment Screen refund (-) Payment Amount for the amount of the returned check.
6. Select a payment method of Credit Memo and click OK.
7. You will be asked “Is payment amount correct?” Answer Yes.
8. Select the Bad Check, NSF, or Returned Check disbursement item (you may need to create this Disbursement Item See the Disbursement How To Guide for help).
9. Enter any comments you may have and press OK.
10. Now you can un-pay the appropriate contracts by entering a negative number in the Paying field.
11. If you do not see your contract, it may have already gone to history. Simply click the Historical Button at the bottom of the payment screen and choose the contract.
12. Once all contracts have been unpaid the Funds Remaining at the bottom of the screen should be zero.
13. Press OK to finish.
14. You may want to add your Returned Check Fee item to one of the contracts.
If done correctly your end of day cash drawer balancing will not be affected and the accounting office will get the accounting entries that reduce the bank account by the amount of the returned check.
If the customer re-submits the payment use the following to record the payment.
1. Take an Account Payment as you normally would